Lead scoring is an effective way to track contacts’ engagements, creating a temperature gauge to plan future messaging and targeted sales outreach.
Similar to playing any game, scores make sense only if you have rules and goals to determine how points are scored. Think of lead scoring as gamifying your marketing and sales process. The points will help determine who your best prospects are and close deals quicker.
What is lead scoring and how does it work?
Lead scoring is a systematic way to rank potential customers by their likelihood to purchase based on behavior, engagement, and demographics. This approach helps marketing and sales teams identify high-value leads, tailor follow-ups, and drive more conversions throughout the buying process.
Each lead score indicates the probability of a lead making a purchase, with higher scores indicating a greater likelihood. Scoring typically ranges from 1-100. Before setting up a lead scoring model it’s important to understand common attributes that help set the baseline for your score.
Explicit vs. implicit scoring attributes
Lead scores are calculated based on various attributes, which can generally be split between explicit and implicit attributes.
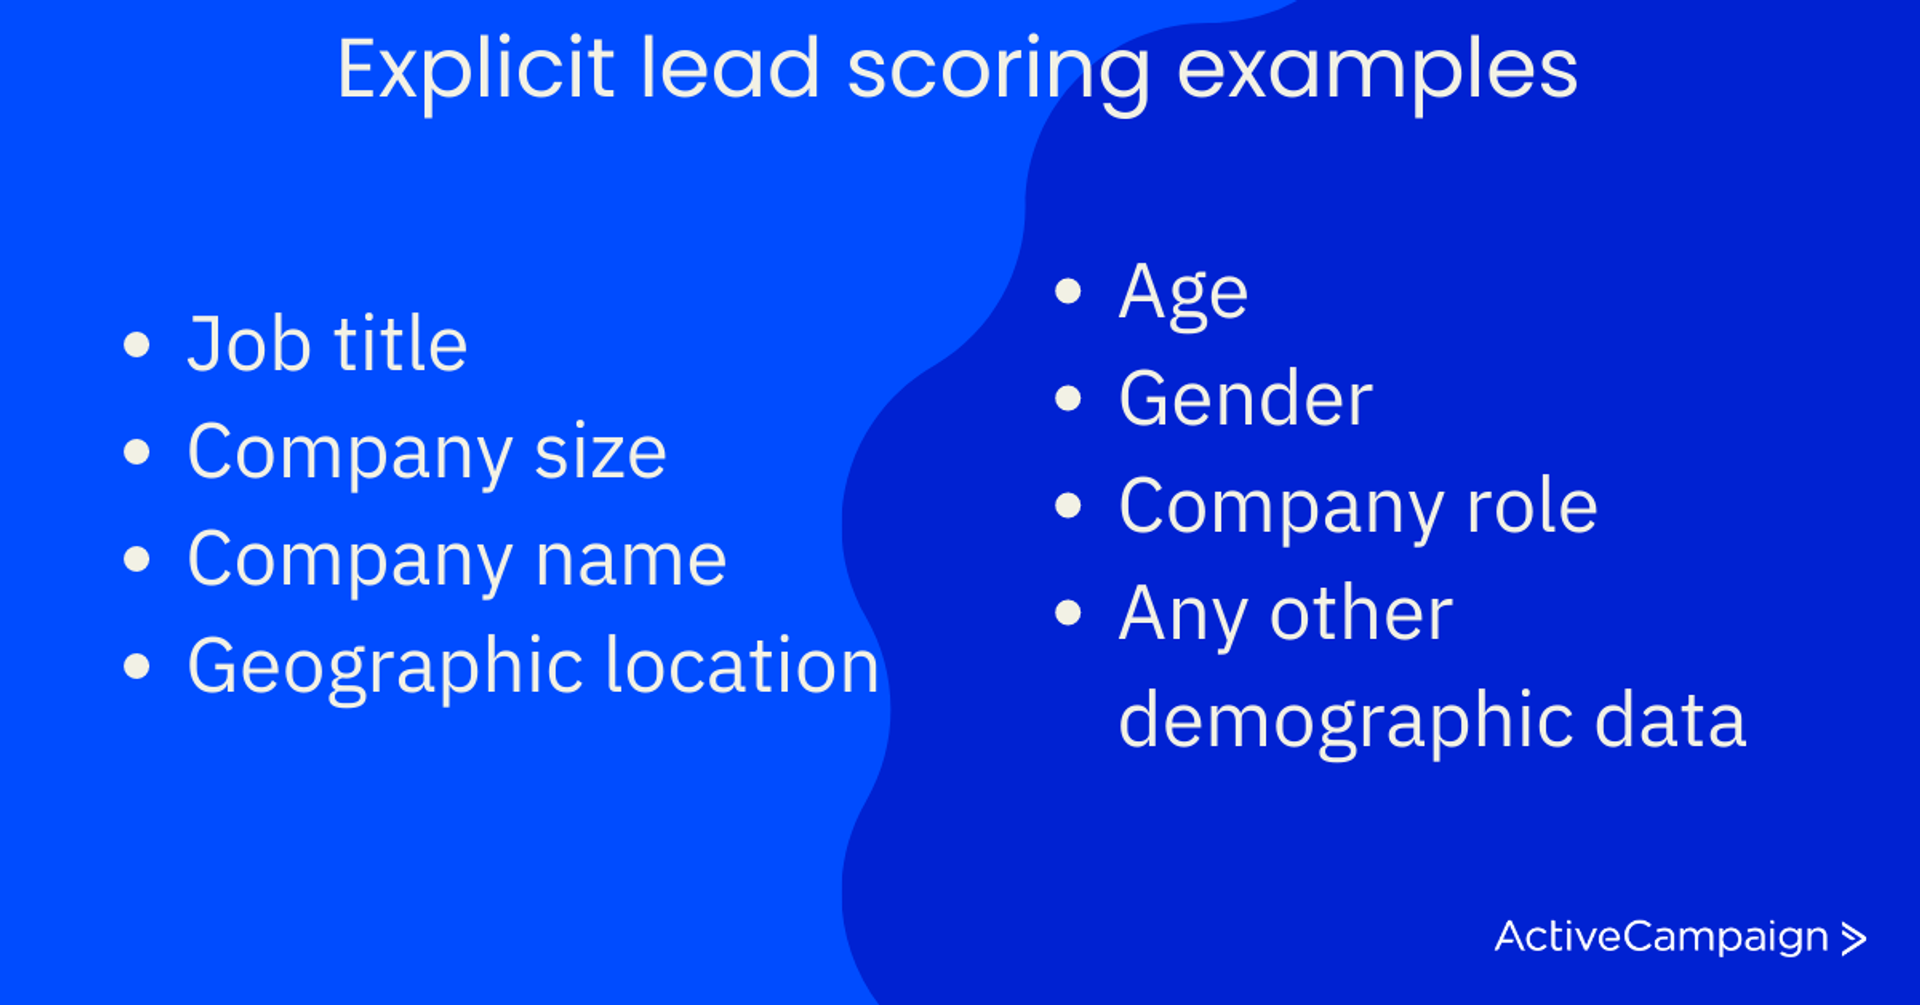
Explicit lead scoring
Explicit lead scoring is the information given explicitly by the lead, such as demographic data. Examples of explicit attributes include job title, company size, industry, and location.
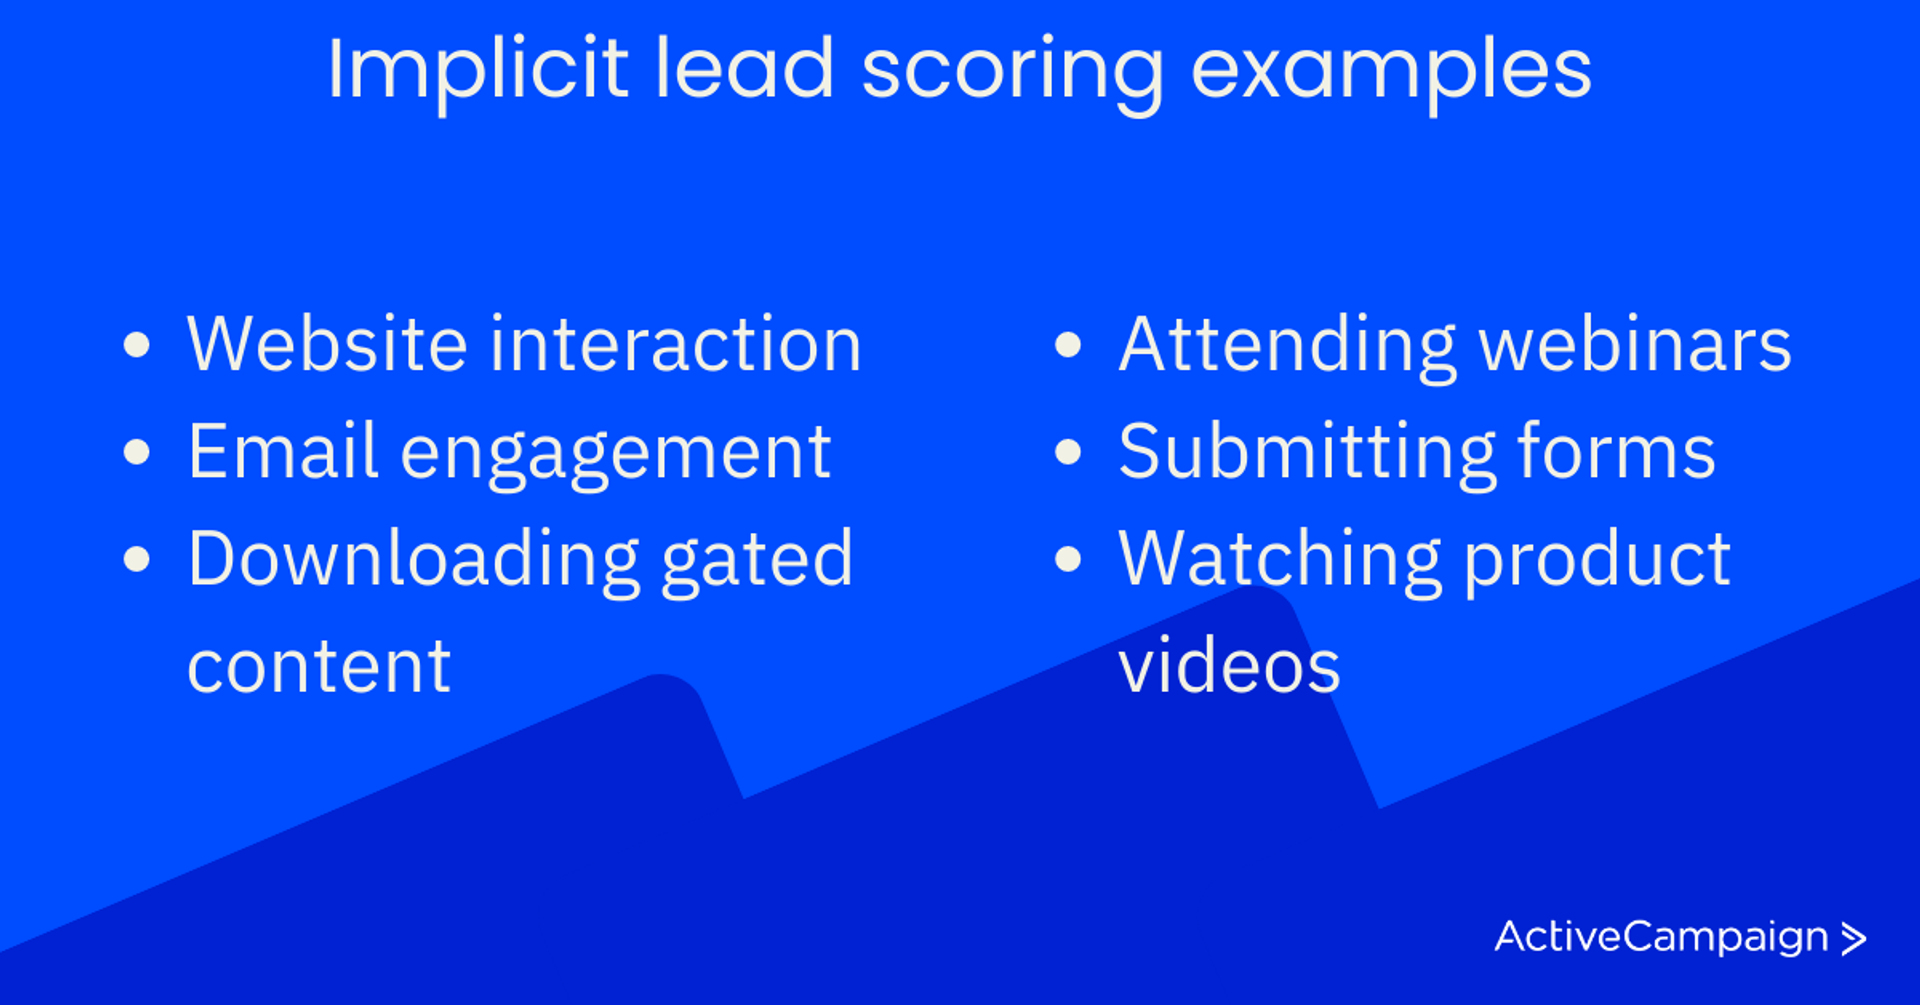
Implicit lead scoring
Implicit lead scoring involves analyzing a lead’s behavior to gauge their level of interest. This includes behavioral scoring, active and passive buying behavior, and interactions in the sales and marketing funnel. Implicit attributes include white paper or gated content downloads, website visits, email engagement, watching product demos and videos, and attending webinars.
Each attribute that applies to a lead earns them points toward their lead score. For example, visiting the pricing page may indicate a high level of interest and therefore add points to their lead score. Conversely, unsubscribing from emails may subtract points from their lead score.
Once a lead reaches a certain point threshold, such as a score of 50, a sales rep will reach out to close the deal. Many companies have sales automation to identify qualified leads and alert sales reps accordingly.
Why is lead scoring important for your business?
Lead scoring is essential for removing guesswork and enabling you to focus on the most promising leads that are likely to convert, something every business can benefit from.
The impact of lead scoring
For example, let’s take the case of TechSolutions, a software development company. Before implementing a lead scoring system, they faced difficulties identifying qualified leads and wasted resources on low-quality leads that did not convert. This led to wasting time and leaving money on the table.
However, after implementing lead scoring, the company identified the most promising leads and prioritized them for sales follow-up, sending those who needed more lead nurturing to the marketing team. By focusing their efforts on high-quality leads, they improved their conversion rates and achieved significant revenue growth.
As a result, TechSolutions expanded its customer base and invested in additional marketing resources to generate even more leads. In short, lead scoring helps you identify where your leads are in the sales funnel, enabling you to focus on the most promising leads and take appropriate action to turn them into customers.
The benefits of lead scoring to your business
Now that we understand the importance of lead scoring in the buying cycle let’s explore the real world benefits it can offer to both the marketing and sales teams:
Lower marketing and acquisition costs
Appcues, a B2B SaaS company, reduced customer acquisition costs by 80% through lead scoring. By prioritizing leads based on their engagement level and fit with Appcues’ ideal customer profile, the company could focus their marketing efforts on the most promising prospects.
Higher conversion rates (CVR) and time saved
LearnUpon, an e-learning software company, increased their MQL to SQL conversion rate by 30% after implementing lead scoring. By prioritizing leads based on their engagement level and fit with LearnUpon’s ideal customer profile, the sales team could focus on the most promising prospects and close deals more quickly.
Improved sales and marketing alignment
Hootsuite, a social media management platform, improved alignment between its sales and marketing teams by implementing lead scoring. By providing sales with higher quality leads and more detailed lead intelligence, the company was able to close deals more quickly and with greater success.
Increased revenue
ZoomInfo, a B2B data and intelligence provider, saw a 45% increase in sales conversions after implementing lead scoring. By focusing its sales efforts on leads that had the highest scores, the company was able to improve conversion rates and drive more revenue.
The evidence speaks for itself. Lead scoring drives revenue growth and provides a range of benefits for your business. The question now is how?
Resources on lead scoring
Want to dive deeper into lead management and lead scoring?
How to score leads in 7 steps
Whether you’re creating a lead scoring system from scratch or want to improve upon an existing one, there is a step-by-step process to better lead scoring. Read on for our 7-step plan and how to apply it to your business.
If you follow these steps, you’ll create a set of lead-scoring rules with enough complexity to prioritize your leads effectively and have a categorically balanced point distribution that considers fit and behavior.
1. Determine minimum customer criteria
Begin by establishing the minimum criteria a lead must pass to become a customer. These are inflexible qualifications. If it’s not truly essential, don’t list it here.
For instance, your customer may need to be 18 years of age or older. Or, they might have to be within a regional service area.
This step will ensure that your sales team doesn’t waste time on anyone who has no chance of becoming a customer. It might seem small or nit-picky, but setting these criteria now will save time forever.
2. Identify characteristics of your target market
Next, identify those qualities that your target market usually possesses. If you are familiar with your existing customer base, you’ll probably be able to list many of these attributes quickly.
In contrast to the minimum qualifications of Step 1, these are common characteristics of your customers but not necessarily essential. For example, if your target market is within a certain industry or company size, these characteristics will help you identify good leads.
The point is to find those prospects that are most like your typical customer. If they are similar to your existing customer base, they are probably also a fit for your product.
This may be a question your marketing team is better equipped to answer because they’ve probably done extensive research into who your target market is so that they can find and speak to them with tailored messages. In fact, your business may already have a set of customer personas from which you can draw.
Your sales team will also have meaningful input here because they are speaking to the market day in and day out.
3. Identify & define your ideal lead
Now you want to identify the characteristics of the “perfect” customer so that these leads earn a higher score.
Consider what makes some leads better than others—what are the qualities and characteristics of your ideal leads? This is a question better posed to your sales team but don’t neglect to get marketing’s input.
Some examples of ideal lead qualities could be:
- Certain size budget
- Having contact with upper management
- Short timeframe to purchase
Like your target market characteristics, these ideal lead qualities will illuminate your best leads and help inform your sales team’s approach.
4. Set behaviors to track
We are now shifting focus from the lead's characteristics and qualities to the lead's behavior. These rules will help identify the most highly engaged and interested leads.
Begin by listing all possible behaviors a lead can engage in. While some behaviors are more important than others, it can be helpful to assign a point value to all behavior (even if it is a very small value). So don’t leave anything out just because it seems unimportant.
Consider using:
- Email opens
- Email clicks
- Email replies
- Email forwards
- Social media shares
- Web page visits
- Website sessions
- Requests to contact
- Downloads and form submissions
- Free trial signups
- Product demos
If you have a follow-up campaign, break it down into individual behaviors.
What are the different calls to action it contains?
Some of these behaviors will be “critical conversion behaviors” (behaviors that most of your leads go through before becoming customers).
These might be lead magnets for things like a free trial or requesting a sales demo. A thorough analysis of your Google Analytics data should make these behaviors obvious.
Mark your critical conversion behaviors with a star so you can give them appropriate emphasis when it is time to tie points to rules.
5. Decide on a lead-scoring model
For many companies, a straightforward 1—100 lead scoring scale will be sufficient, but there are additional options opened up by adding digits to your scoring structure.
If your company deals with different types of leads, you could use the thousands digit to classify a lead. For instance, in B2B markets, you might classify leads as “small business,” “medium business,” or “large business” with a 1, 2, or 3. So a lead with a score of 2089 would be a medium-sized business rated with a score of 89.
Example of a 4 digit lead score
If you identified minimum qualifications in Step 1, you could use a lead’s score to qualify them aside from other factors. This way, a bad lead never makes its way to your sales team (no matter how many behavior-based rules they trigger). To do this, you could give out blocks of 100 points for specific “must have” criteria, so a lead only reaches your threshold for qualification if they match all those necessary criteria.
For instance, you may need leads located in a specific region of the United States, have a contact in a specific department, and are in a certain industry. By giving out 100 points for each of these criteria, a lead only becomes sales-ready when it reaches 300 points. The tens and single digits further refine the score based on more malleable lead characteristics and engagement. So a lead with a score of 389 would be passed to the sales team, but 1 with a score of 289 would not.
| Meets minimum customer criteria? | Target market points (?/200) | Behavior points(?/100) | Pass to a sales team? (275+) | |
|---|---|---|---|---|
| Lead A | Yes | 100 | 88 | 188 |
| Lead B | Yes | 200 | 78 | 278 |
| Lead C | Yes | 200 | 71 | 271 |
This is just one example of a lead scoring system that prioritizes target market characteristics.
Avoid over-scoring: Keep in mind that repeated email opens or link clicks could be accidental or simply out of curiosity. Awarding too many points for such actions can inflate a lead’s overall score, giving a false impression of buying intent.
Consider using short expiration periods or caps on points for repeated behaviors to ensure your lead scores reflect meaningful engagement.
6. Distribute points across qualities and behavior
Now that you have a system and a set of rules, it’s a matter of distributing your points.
As we mentioned earlier, it is tempting to look at a rule and give it a point value because it’s pretty easy to judge the importance of each rule based simply on logic, but this can lead to problems, so resist the temptation.
Instead, begin by assigning a maximum value to categories of rules. From there, you can distribute points to individual rules in each category.
This way, you’ll end up with a balanced system that gives proper weight to different factors. This approach will prevent a lead scoring system that scores leads highly simply because they match your target market or display highly engaged behavior—it will take a bit of both to achieve a high score.
You may want to divide your points evenly between characteristic rules (Steps 1-3) and behaviors (Step 4) so that you give appropriate weight to fit and interest-based rules.
If a lead can only earn 50 points (out of 100) from behavior, they’ll probably never make it to the top unless they also match some of your ideal characteristics. But 50 points is enough that engagement is a significant factor in a high score, and there are plenty of opportunities for engaged leads to raise their score.
Scoring examples
You may want to give equal weight to the “good fit” rules you created in Step 2 and the “ideal prospect” rules you created in Step 3 so that your best leads have the opportunity to distinguish themselves. So you might distribute 25 points (out of 100) toward a “good fit,” and an “ideal” lead can earn an additional 25 points.
You may also want to give equal weight to “critical conversion behaviors” and “interest indicating” behaviors. This way, a lead can receive a high rating for interest, but they won’t rank as high as someone who has also engaged in critical behaviors.
You can vary the specific proportion of points according to your experience with your prospects. The important thing is that you divide up your points along categories in logical ways before assigning those points to individual rules. This way, you can be sure that the distribution of points leads to meaningful, well-balanced scores.
7. Refine and tweak lead scores
As long as you continue to make adjustments, your lead scoring system will continue to improve over time. Create a schedule for reviewing its performance. Every 30 days might be a reasonable time frame in the beginning.
Once you have 30 days or more of data, you can begin to do some analysis:
- Were there low-scoring leads that ended up converting?
- Were there many highly scored leads that didn’t convert?
Try to identify new lead-scoring rules or adjustments in point distribution that could have prevented these scenarios. Focus on the low-scoring leads that ended up converting, especially. You may find that a certain behavior or characteristic is more important than you initially thought.
Some great leads just won’t convert, so you should expect some inconsistencies there, but you want to be sure you are identifying all your best leads. A high number of low-scoring leads that end up converting indicates that your current scoring system might not be identifying all your best leads. If you examine these leads closely, you may find additional rules that would have included them.
It’s unlikely that your lead scoring system will be perfect right off the bat, but as long as your average lead score for “prospects who end up converting” is higher than the average lead score of “those who didn’t convert,” you know you are on the right track.
How to create a lead scoring system in ActiveCampaign
Let’s explore how to enhance your marketing efforts by creating a lead-scoring system. By effectively utilizing lead scoring, you’ll be able to prioritize your leads, nurture them efficiently, and ultimately boost your conversion rates.
Understanding lead scoring
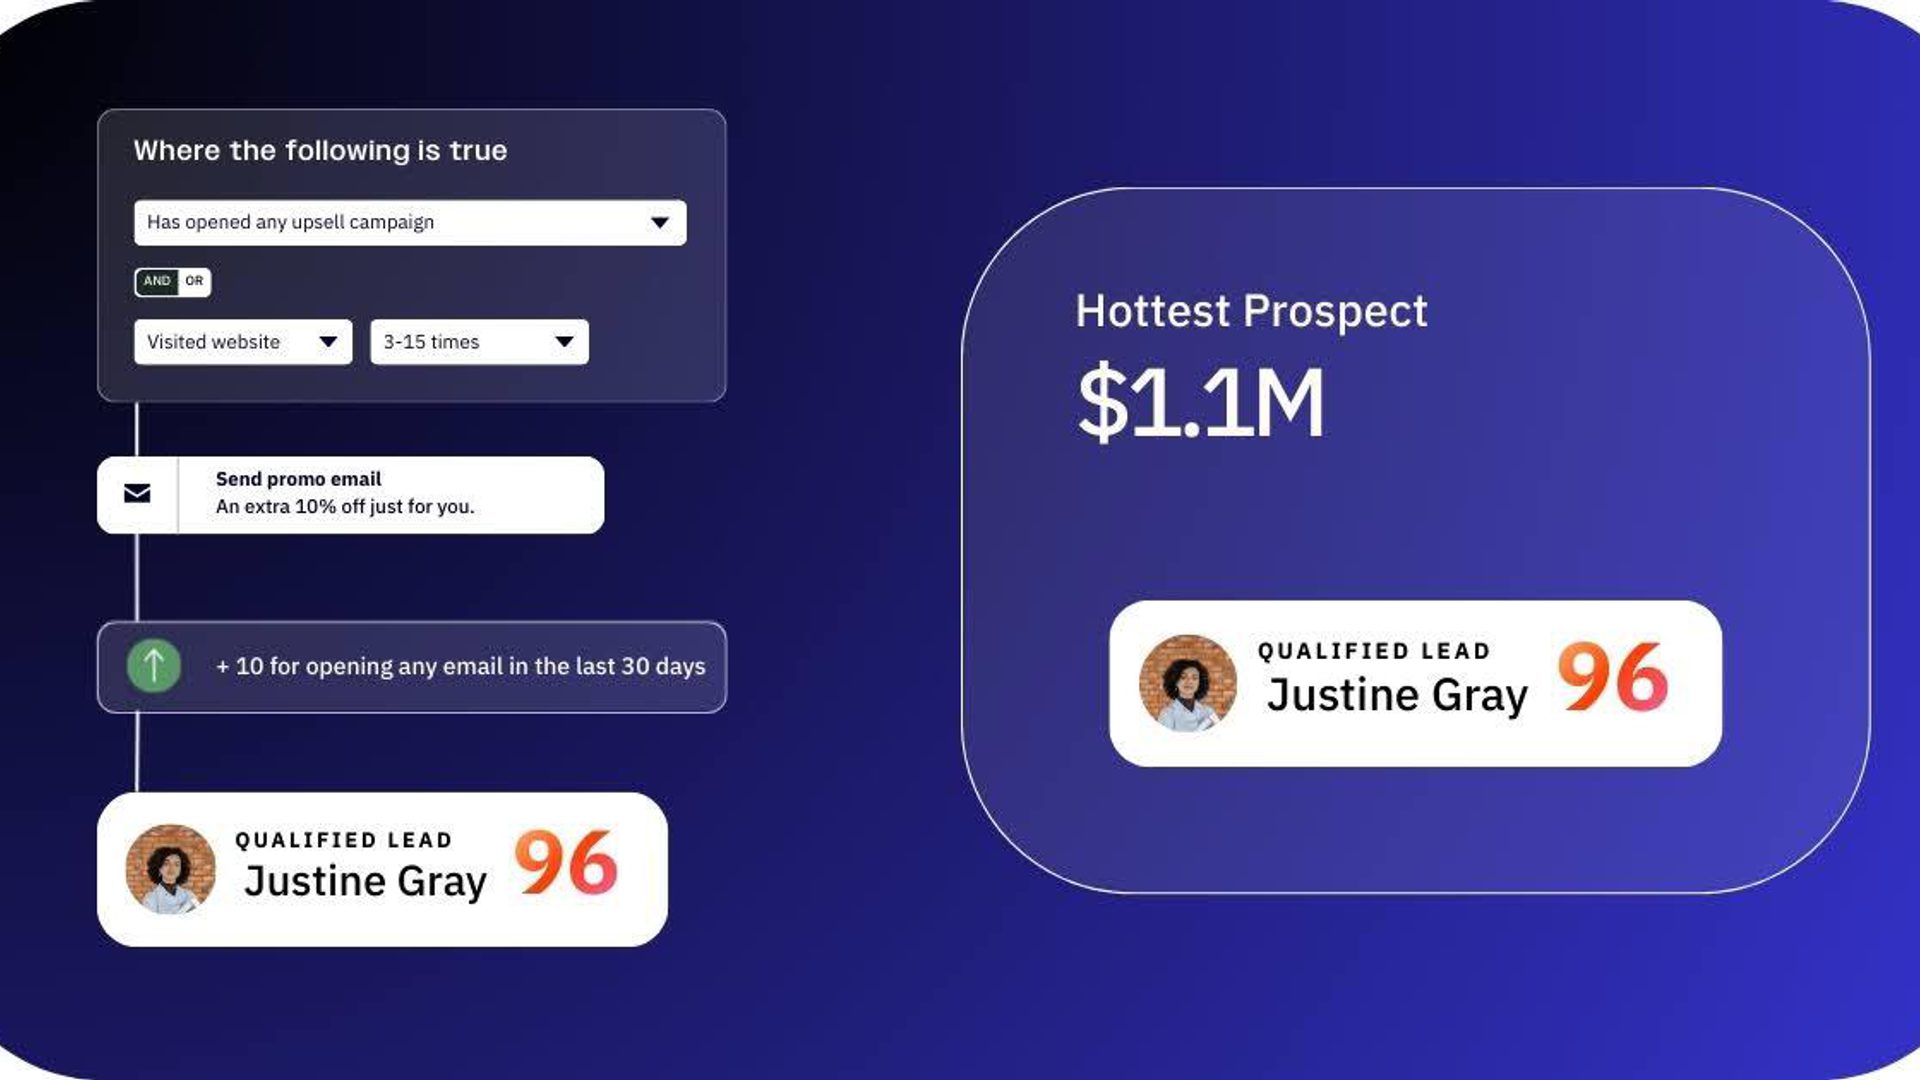
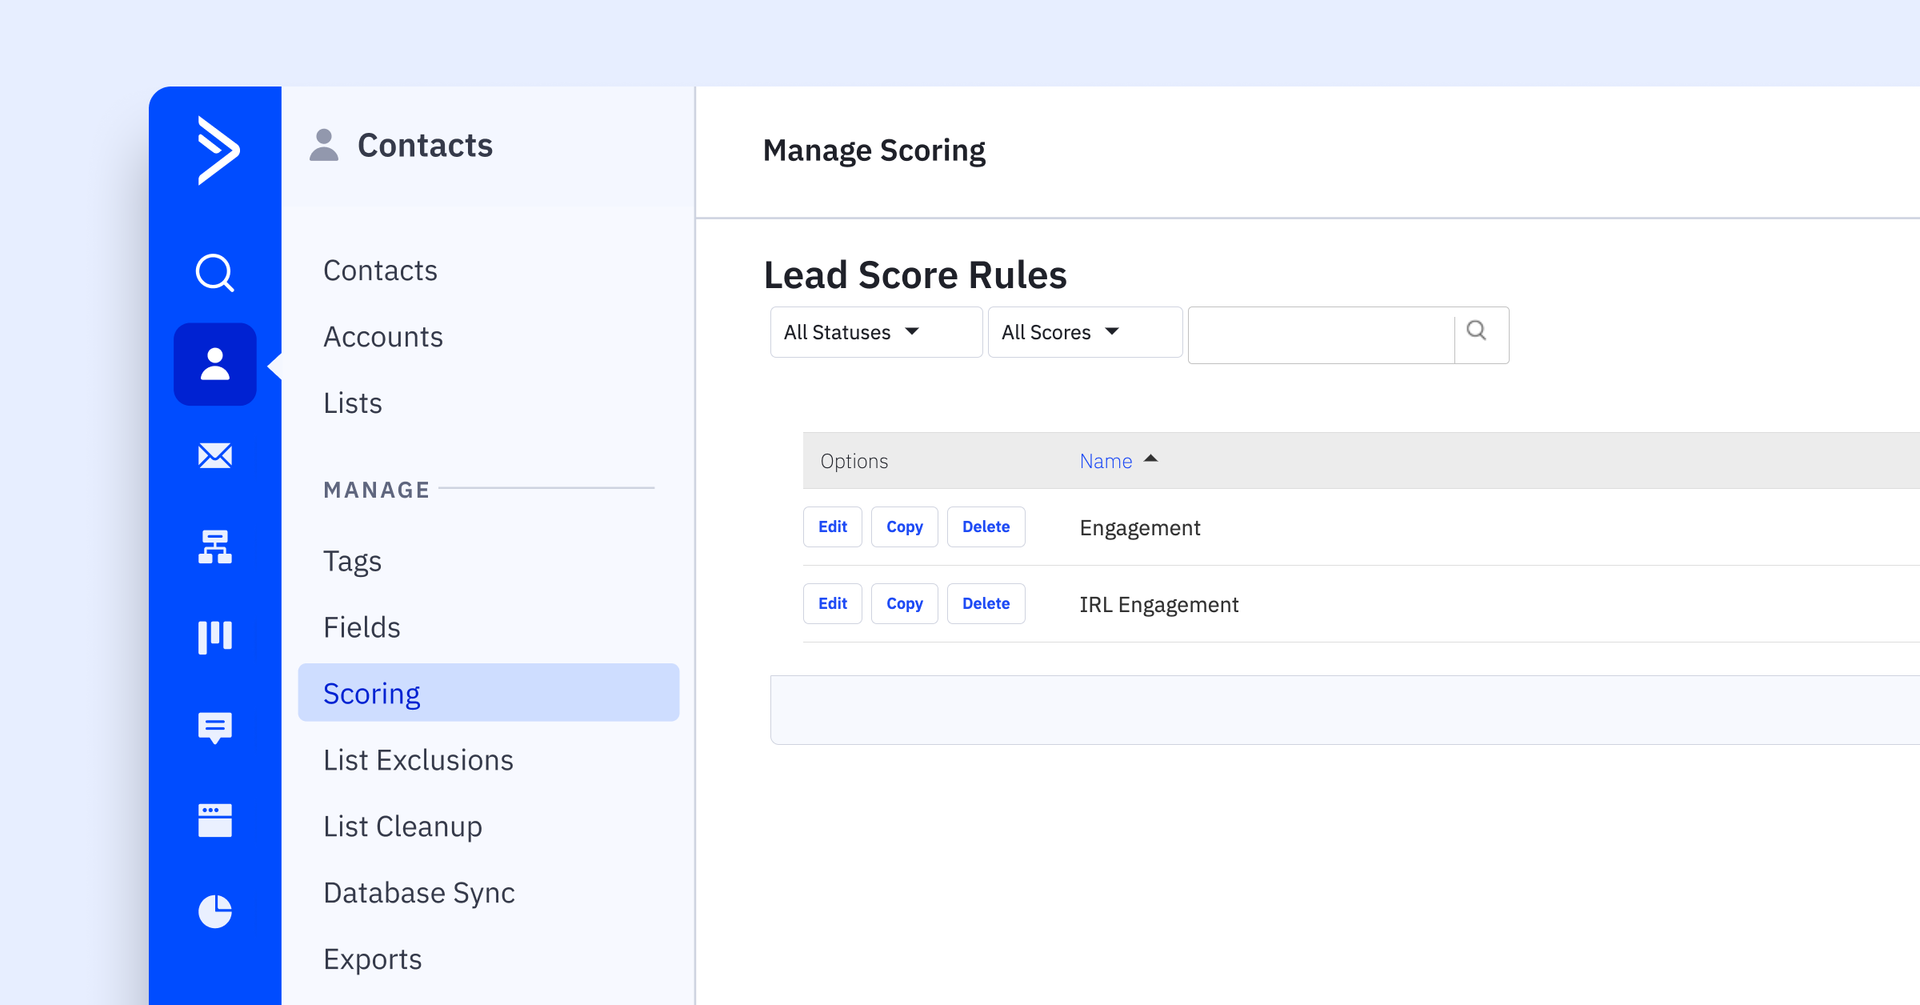
You can award points for a variety of actions. Points can be awarded or subtracted and can expire after a set amount of time. In ActiveCampaign, lead scoring is found in the “Contacts” tab, and then in “Scoring”:
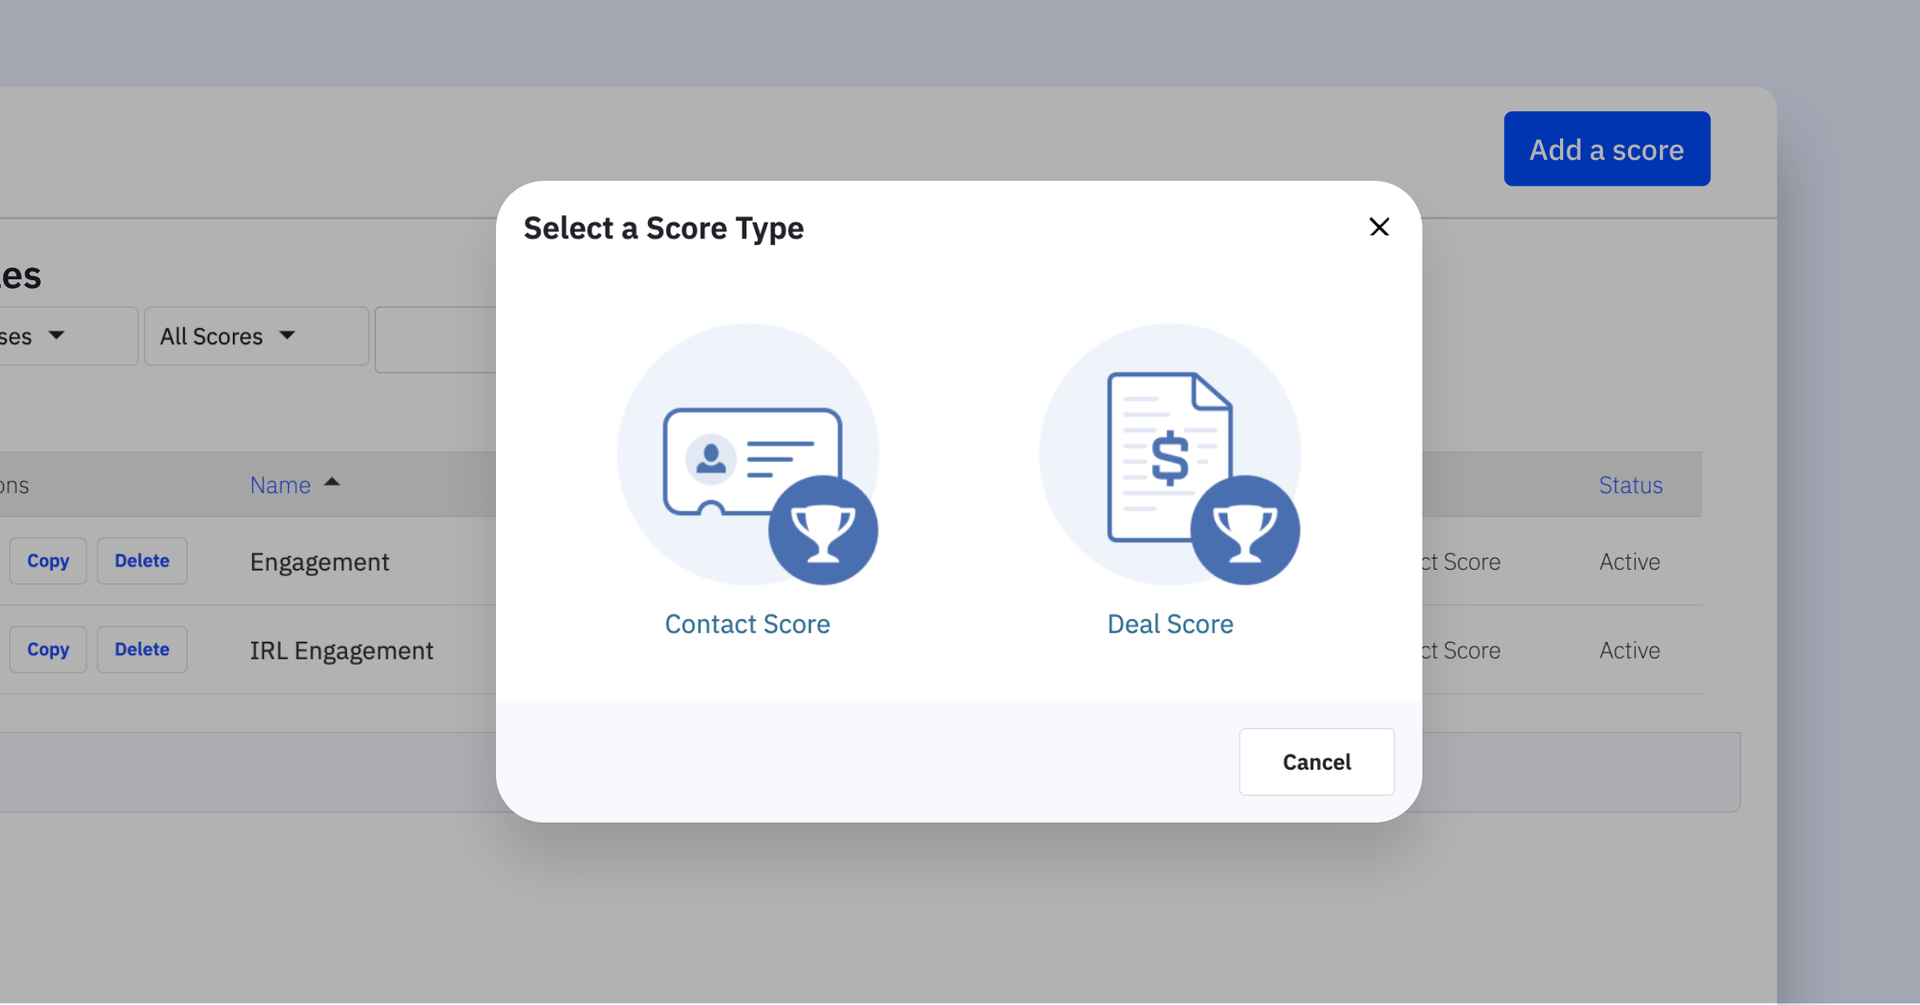
When you click “Add New Score,” you denote if the score is for a contact or a deal.
For our example, we are creating contact scoring rules relating to engagement, let’s make sure we are editing the name of our scoring rules to be ‘Engagement’.
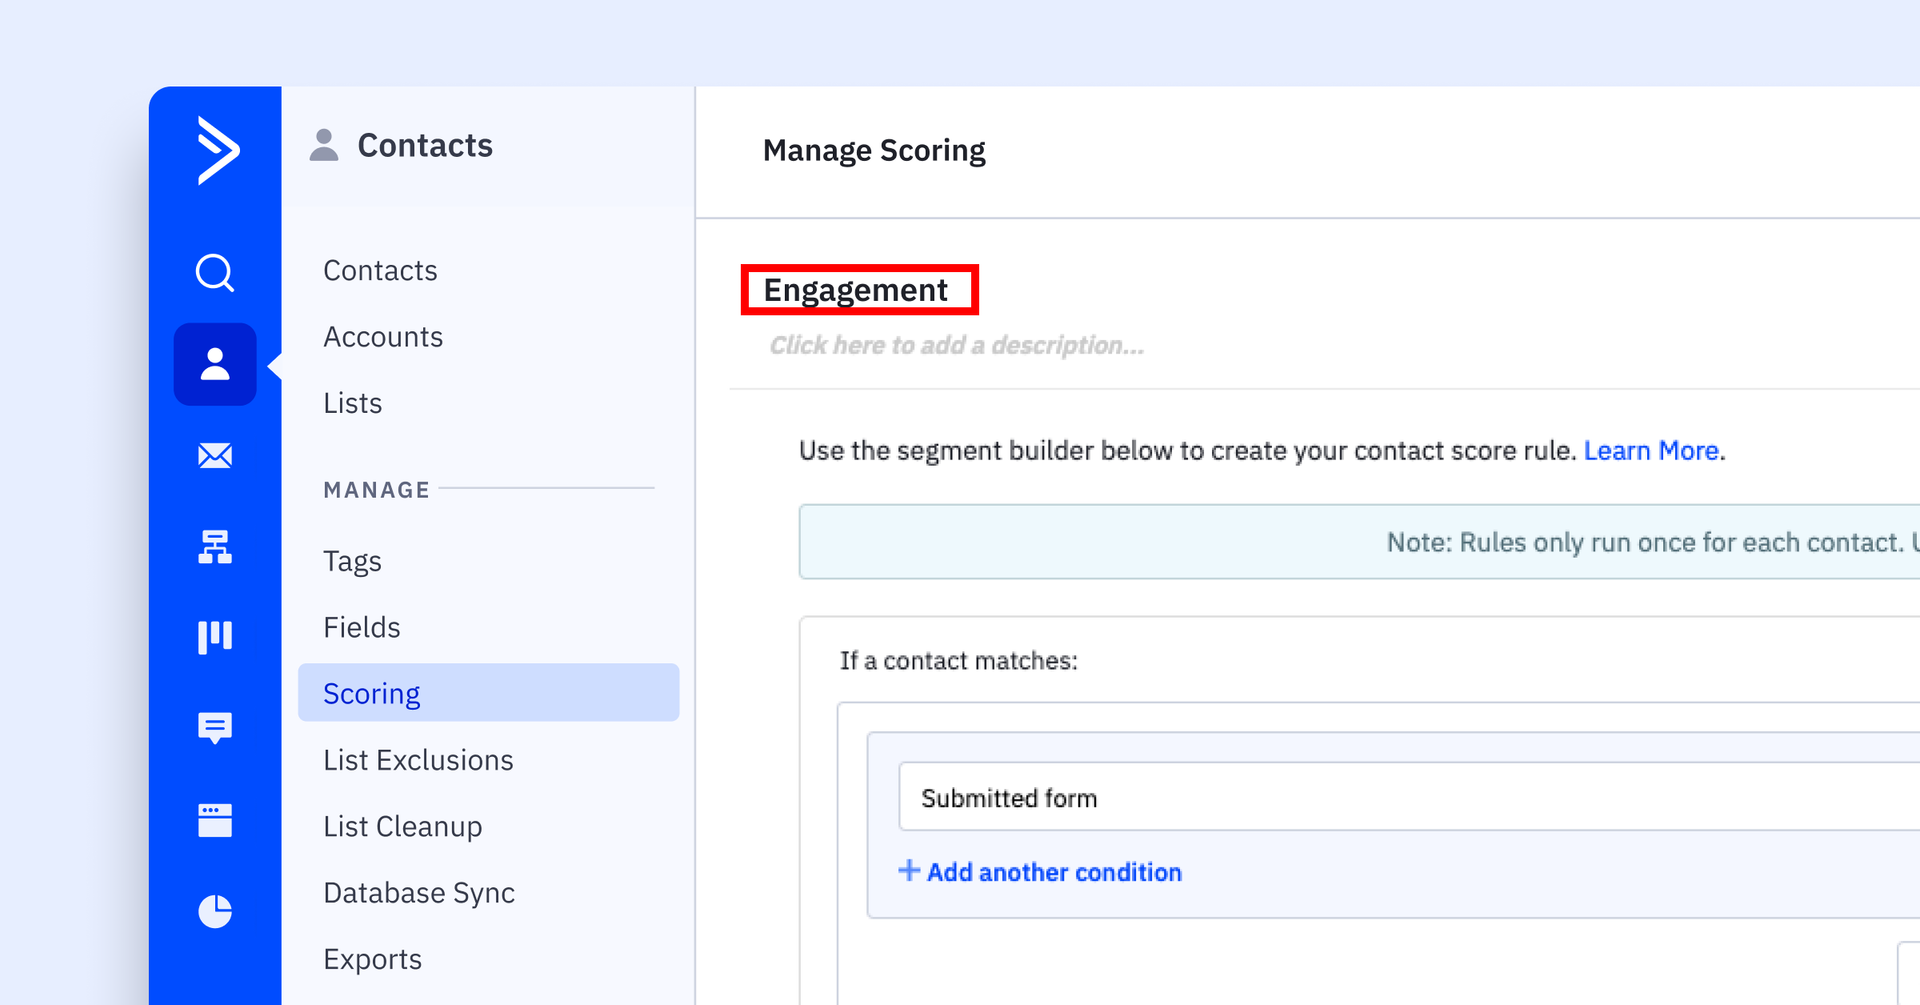
Then, after we ‘Add a New Rule’, the familiar conditions screen will pop up, allowing you to input your conditions. We want to award five points to someone who signs up for a newsletter through our Newsletter form. When complete, be sure to set your Lead Score Rule to Active in the upper right corner.
Note: A contact either meets conditions or does not. Meeting a condition adds or subtracts a value only once; the points are not cumulative. In our example, the only rules we’ll put in our Engagement score are actions people will take only once. Examples include subscribing to a newsletter, downloading a specific report, or attending a particular event.
Now that we have an Engagement score, we can add points to the Engagement score in our automations. For example, if we send an email to our new newsletter subscribers, who have just earned five points by completing our form, we may also want to give them points for actually opening the email.
Because opening an email is a smaller commitment than completing a form, we’ll award two points for the act. Additionally, points can be set to expire. If you want a good read of how hot or cold your leads are, expiring points will help you keep track.
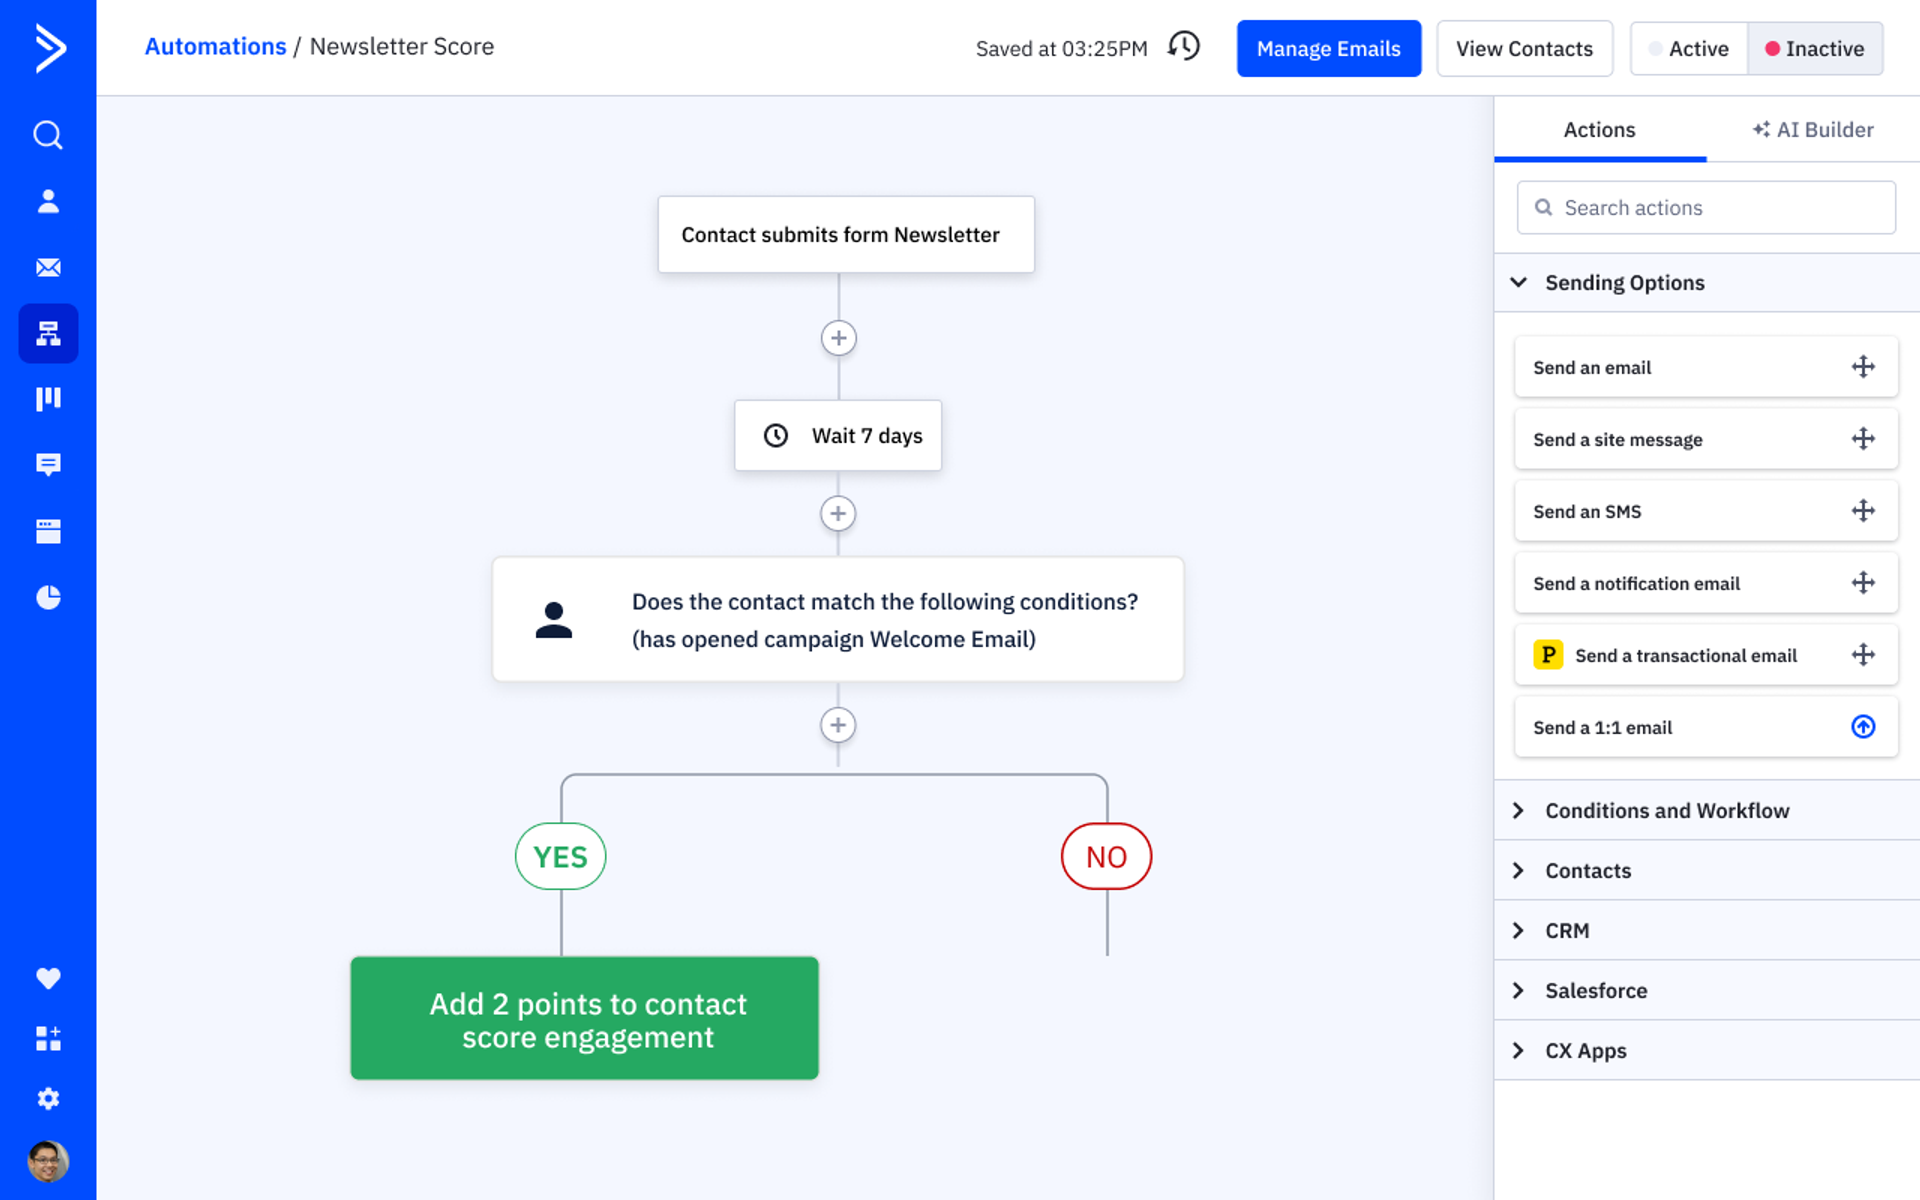
In this example, we used an If/Else statement to award points to contacts who open the email. The points are set to expire after three months.
Now that we know where and how to add points let’s think about overall planning.
Strategy first
In order to determine how your organization should score your contacts, you have to understand what’s important to your organization. What kind of actions do you hope your audience will take? What communications do you send, or what events do you plan? How do you determine if a contact is hot or cold?
There are several different actions that could be important for a contact:
- Subscribing to email updates
- Requesting a free informational download
- Requesting a consultation
- Registering for an event
There are also actions that, in the aggregate, may add up to an engaged contact. While these actions may seem small on their own, the aggregate can show a bigger picture. For example:
- Opening an email
- Clicking a link
- Visiting a particular URL more than once
Understanding all the different actions your contacts can take, and learning their tendencies, will help you along the way.
Data-driven planning
Look at your data and get a feel for any similarities between your contacts that ultimately convert.
For example, if a large percentage of conversions occur following a free consultation, awarding a higher number of points for a consultation makes sense. Those leads are historically more likely to convert than others.
Monitoring cold leads can also help you make strategic decisions. A contact may open a few emails but never take any additional actions. A small action like opening a single email doesn’t call for another email; you want to avoid being considered spam!
Awarding points
Now that you have a handle on what’s most important, you can add to your Engagement Lead Score rules.
Remember: Contacts only trigger rules in the Scoring section once, and the points are NOT cumulative. You don’t want to put repetitive actions here as a best practice.
- Subscribed with Newsletter form submission = 5 points
- Requested a report through Request free report form = 10 points
- Has achieved goal Requested Consultation = 20 points
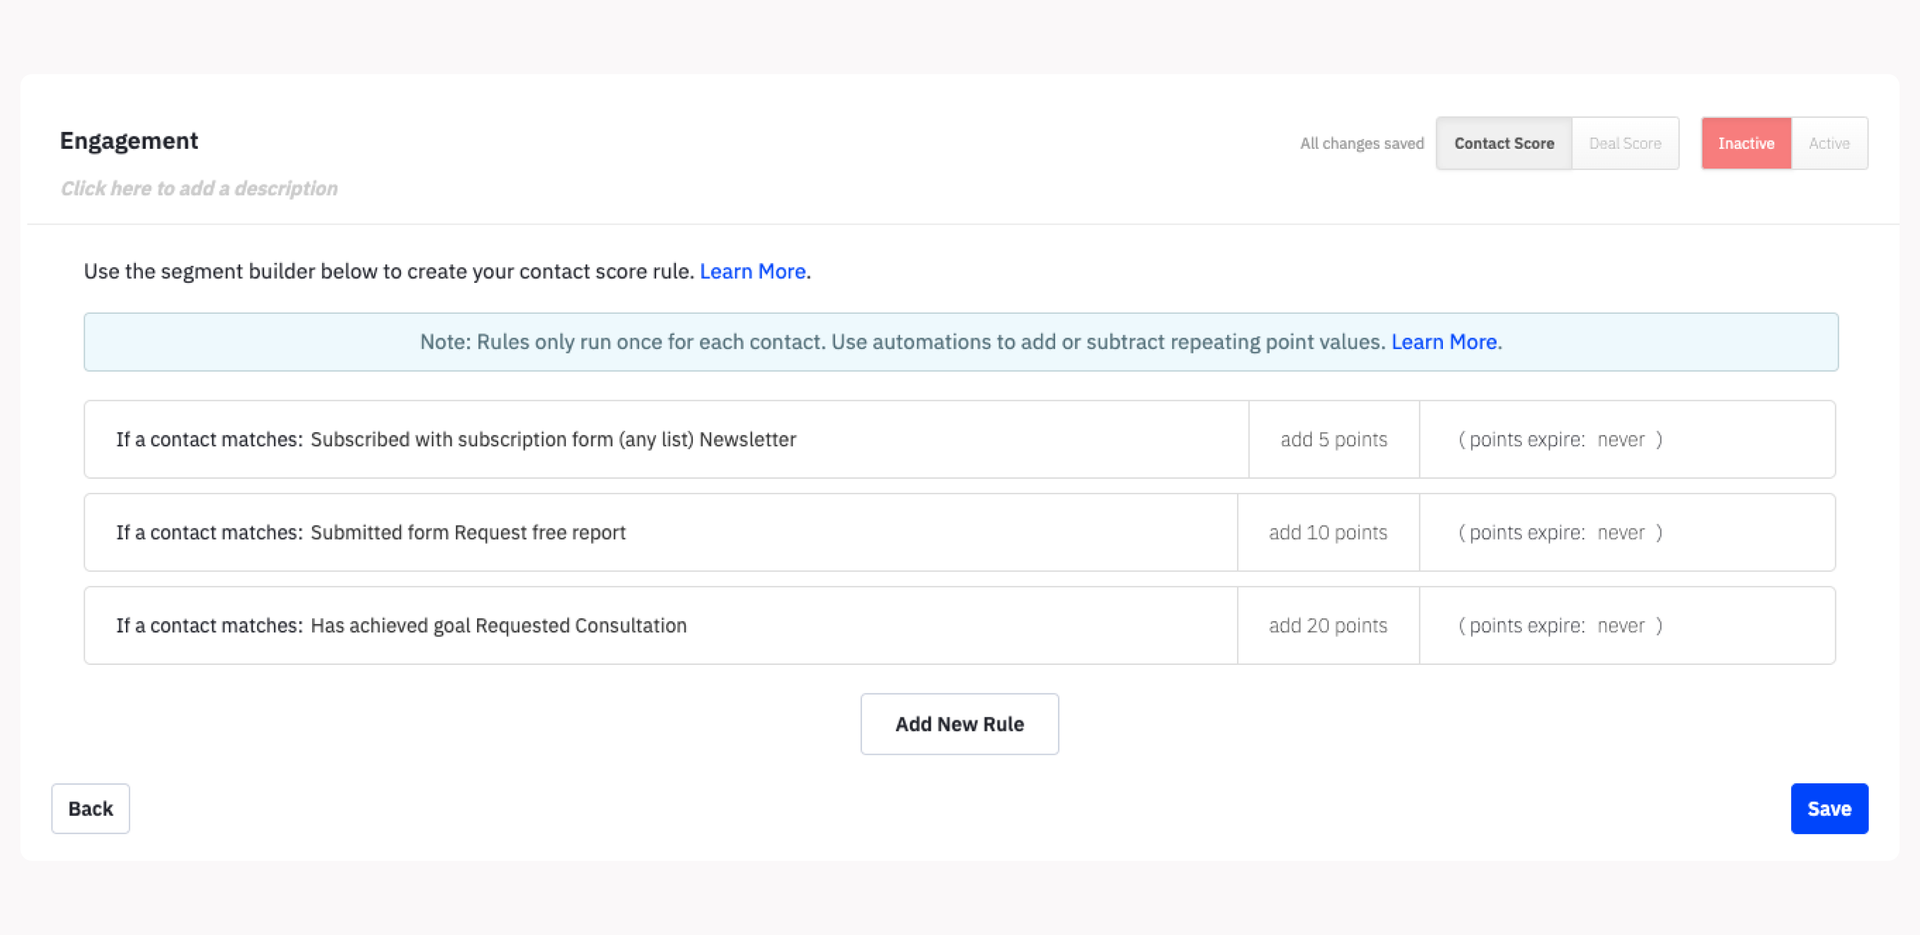
We’ve determined that these actions mean a lot to our organization and signify a greater level of interest from our contacts. They’ll also take these specific actions only one time. We’ve scored them to give additional insight into the engagement level of our audience.
You can also set up automations that award points. As noted earlier, not all points are created equal. Some points may need to expire because smaller actions may not be a meaningful way to determine engagement.
For example:
Opening an email = 2 points, expire after 3 months
Clicking a link = 5 points, expire after 3 months
Simply opening an email doesn’t require much effort. That is why those points expire: if someone just opens emails and racks up points but never takes any additional actions, there’s no need to identify them as a particularly hot lead. (Additionally, if many people open your emails and take no additional actions, you may want to revisit your messaging.)
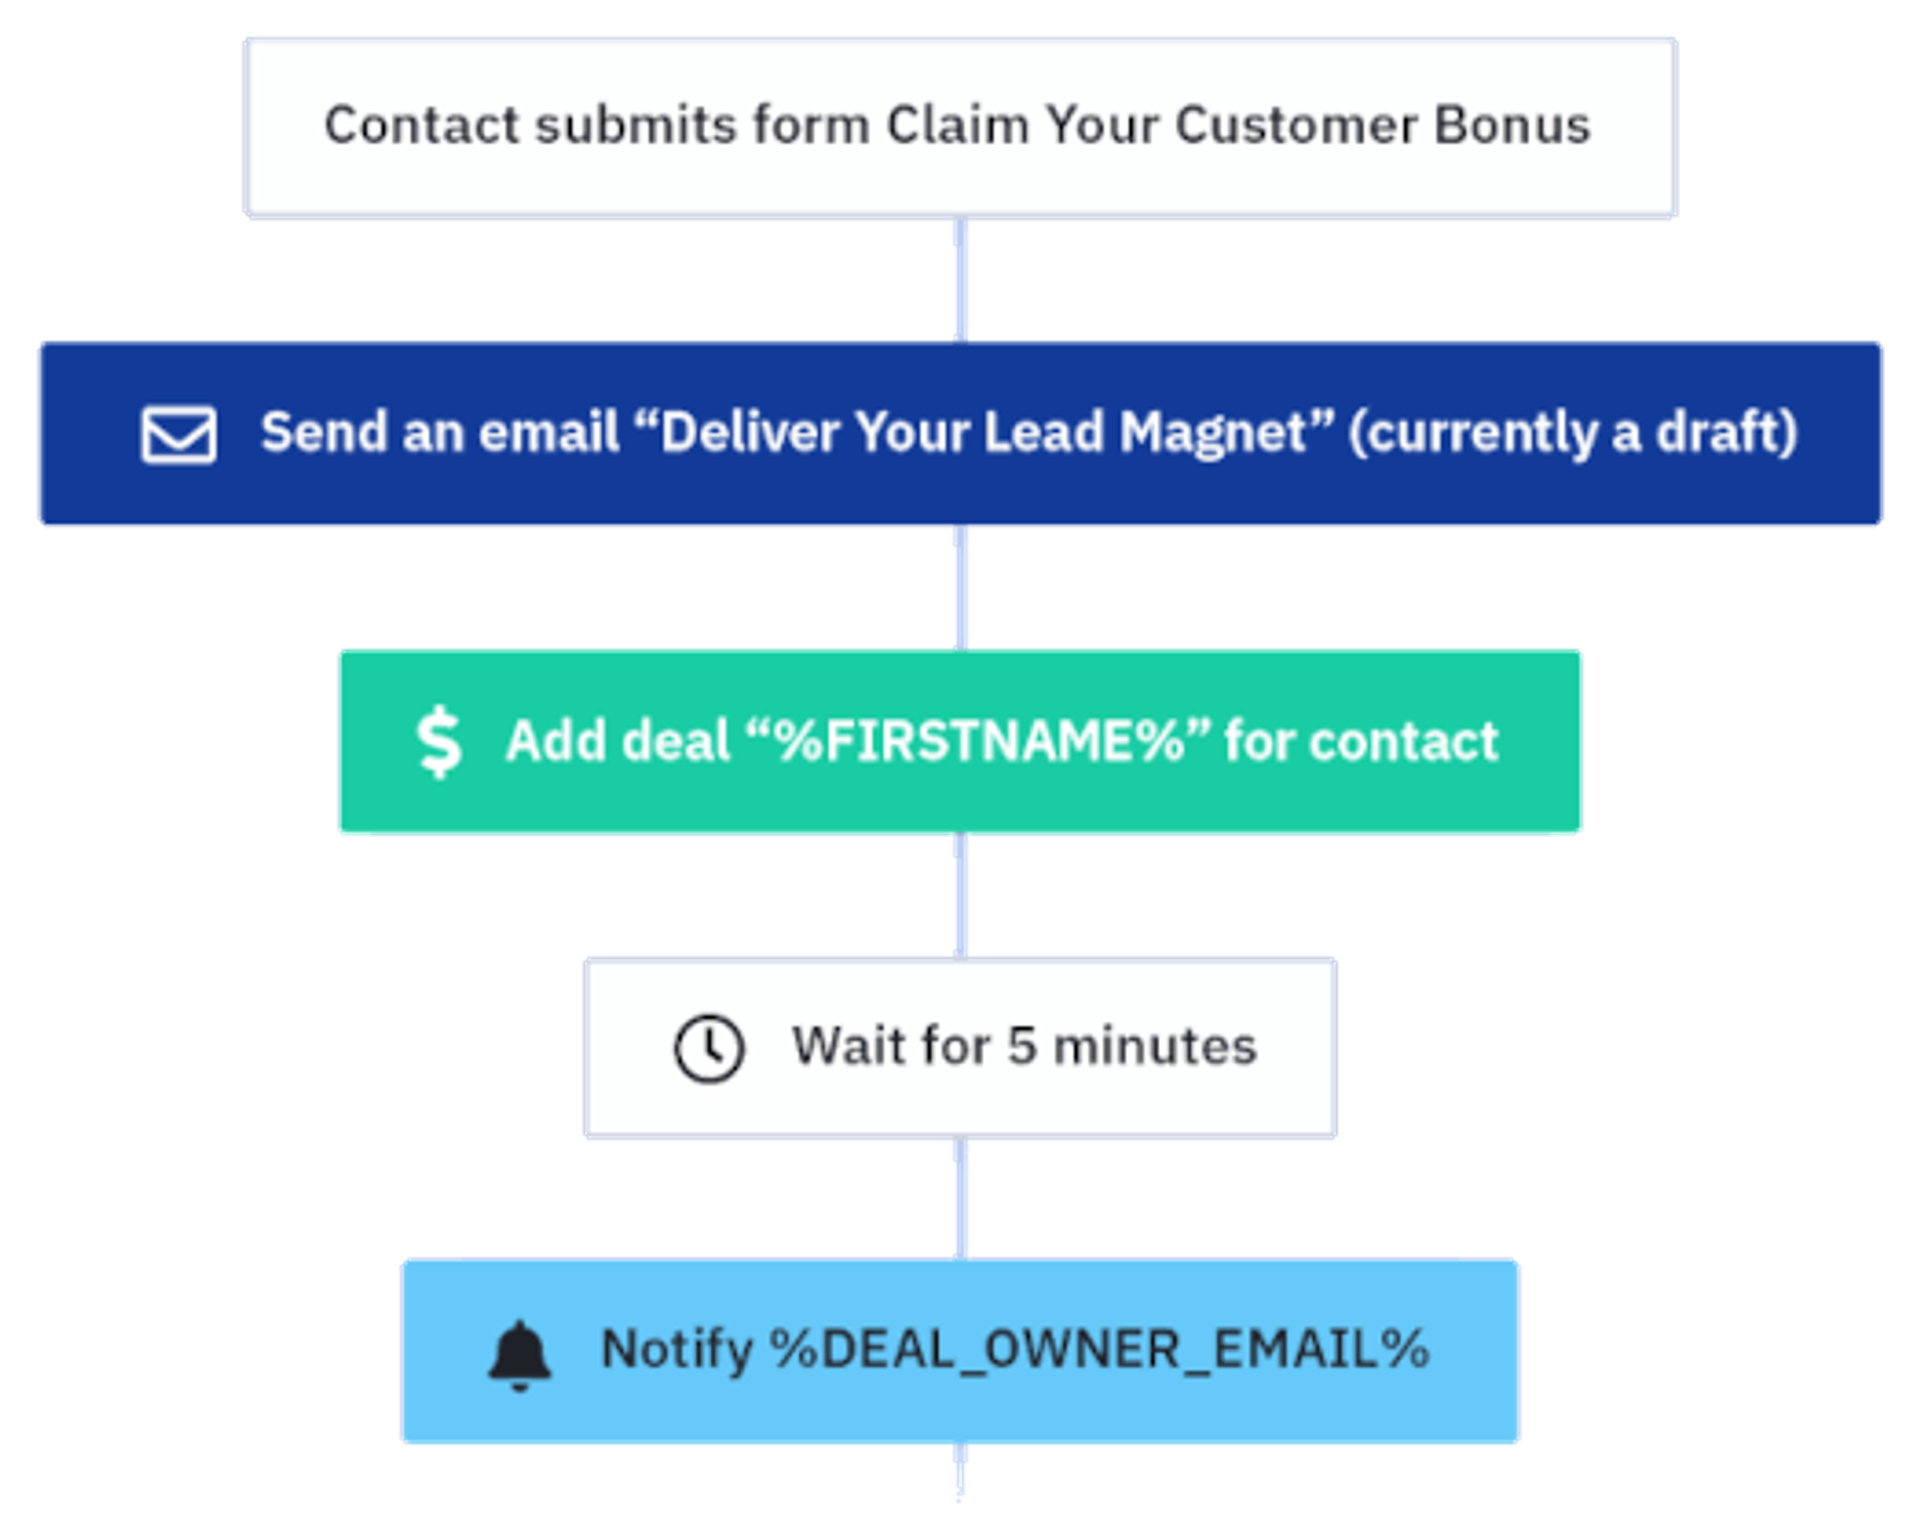
Deliver gated content to new contacts and create a deal in your CRM — all with one automation.
Do even more with lead scoring
Lead scoring is a powerful way to individualize marketing automation across all types of businesses. If you’re looking to improve an existing lead-scoring system, check out our post on creating an effective lead scoring system.
Ready to get started? Get your lead scoring system set up right and sign up for a free trial below.
Lead scoring FAQs
Ready to fine-tune your lead scoring approach? Here are answers to common questions about building, refining, and maximizing your lead scoring system.
What factors should be considered in a lead scoring model?
A strong lead scoring model typically combines demographic or firmographic data (like job title, company size, or location) with behavioral data (like email opens, website visits, and form submissions). Assign higher point values to the attributes and actions that best indicate conversion potential—ensuring that your most qualified prospects get top priority.
How does lead scoring improve sales and marketing alignment?
When both teams share a common definition of a “qualified lead,” it’s easier to track progress and evaluate success. Marketing focuses on generating leads that match the agreed-upon criteria, while sales can prioritize those with higher scores. This alignment streamlines handoffs, reduces friction, and ultimately boosts conversion rates.
What role does AI play in improving scoring in lead generation tools?
AI can surface patterns in customer data that might be missed by manual scoring rules. It uses machine learning to adjust your model based on historical performance—automatically refining weights and thresholds over time. This leads to more accurate predictions and enables better targeting of high-value leads.
How often should I update my lead scoring model?
Regularly review your model—at least once a quarter or whenever you introduce a new product, market, or campaign—to keep scoring aligned with current goals.