
Introduction
In our migration guide, we say that forms are the doors to your contact database, and that really is the best way to think of them. Contacts enter your database by submitting information to forms. Without forms, your database would be closed off to potential contacts.
This guide tells you what you need to know to create and edit forms, and it explains why using ActiveCampaign forms is crucial to your success with our platform.
Creating A Form
To access the ‘Forms’ page:
- Click the website icon (labeled “Website”) in the side menu
- Select “Forms”
On that page, you can organize your forms. You can also filter forms according to the action you set to automatically execute after each submission. By clicking the down arrow to the right of each row, you can preview, integrate, duplicate, and delete a form.
Additionally, you can click “Statistics.” A window will appear that details the date the form was created, the number of form submissions, the number of contacts created via that form, and the number of deals created as a result of that form.
You can also create new forms from the main form page by clicking the blue “Create a Form” button. Doing so generates a “Create a form” window. In it, you name your form, choose the type of form you wish to create, and determine what action(s) you want ActiveCampaign to perform each time a contact submits the form, known as a form action.
You can choose from four types of form displays: inline, floating box, modal pop-up, and floating bar. How they are displayed is demonstrated in the below image.
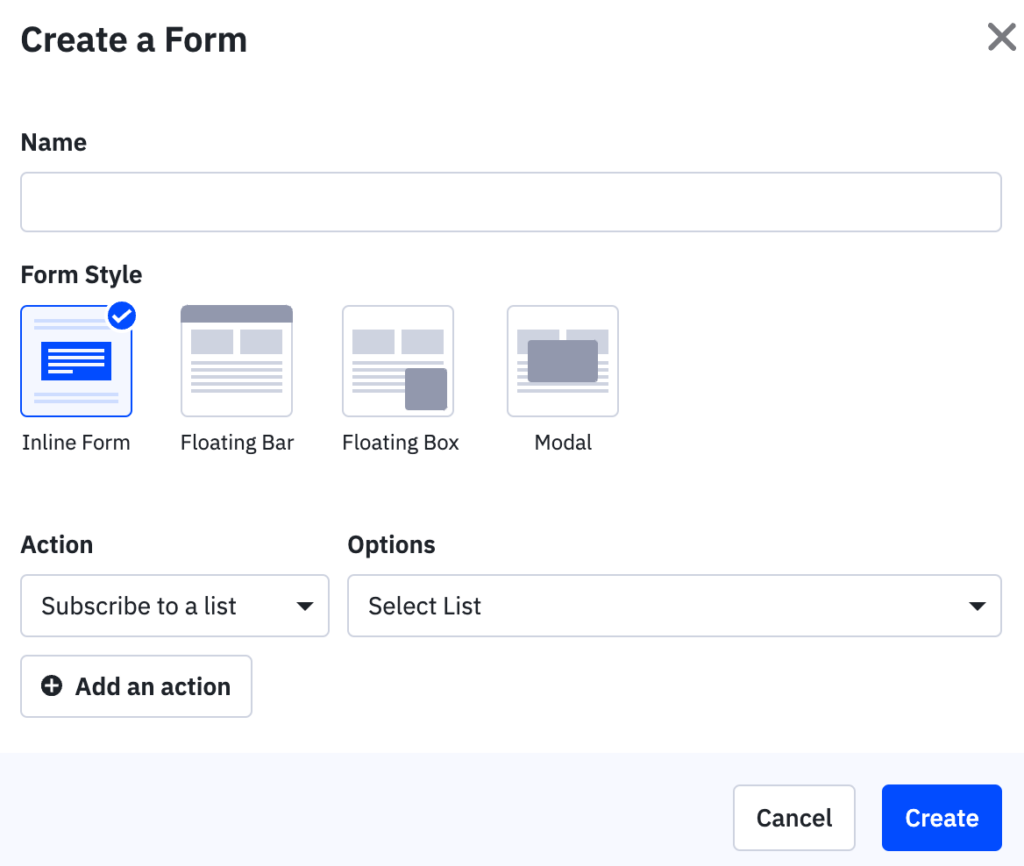
Note: The Lite plan includes only the inline form display. All other plans include all four display modes. You can find more information here.
You can add to each form as many form actions as you like; you are not limited to a maximum number of actions per form. The form actions you can choose from are:
- Add a tag to the contact
- Create a deal and add it to a specific pipeline and stage
- Notify an employee of form submission,
- Subscribe contact to a list.
Edit Your Form
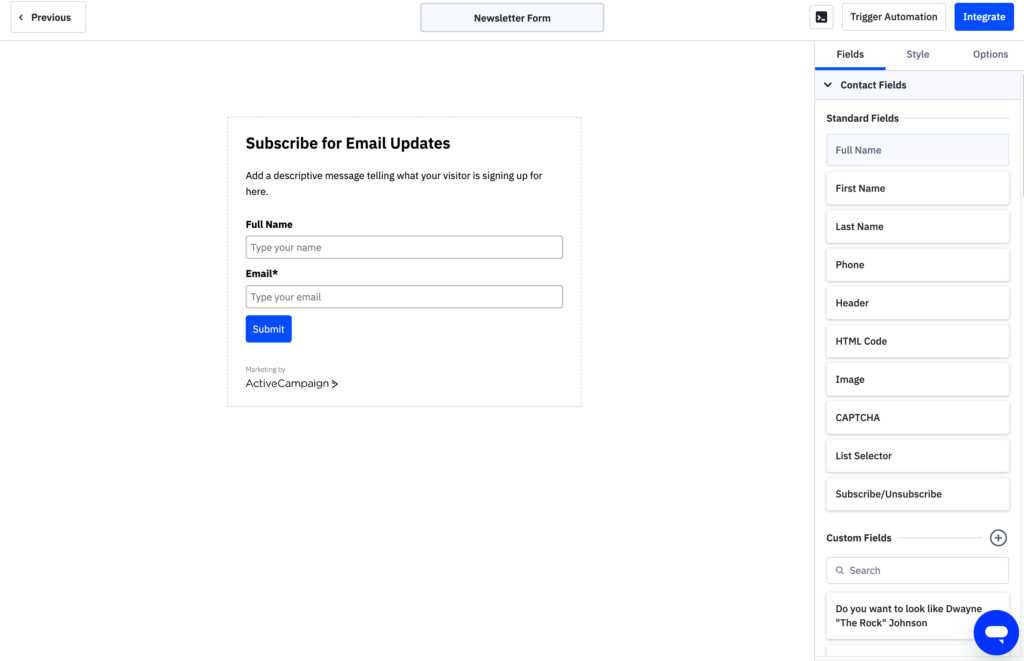
After you click the “Create” button, you can further edit the form before integrating it (aka adding the form to your web assets). All editing takes place in the form editor, pictured below.
You can also access the form editor by clicking the “Edit” button on the main forms page, beside a form.
Our form editor is equipped with seamless drag-and-drop capabilities. From the black sidebar on the right, you can drag custom fields and add them to your form with ease. To remove a field from your form, hover the cursor over it and click the “X” that appears to the right of the field.
By default, any custom fields you have created appear under the “My Fields” button. If you click “Standard”, a list of fields created by ActiveCampaign will appear. You will recognize the first five fields on the “Standard” tab as the fields you see on contact records. The remaining fields aren’t visible on contact records, as they are related to form creation but not to contact information. They exist so you can further customize your form.
For example, the fact that a contact has clicked on a CAPTCHA would be important when submitting any form, but this information would not need to be shown on the contact record.
Additionally, you can create new custom fields in the form editor. In the “Fields” tab, click the green “Add a Custom Field” button in the lower right corner. Doing so starts the process of adding a new custom field to your repertoire.
You have great flexibility when working with forms and custom fields, including:
- Access to unlimited custom fields
- Displaying custom field data via personalization tags
- Creating custom fields on the fly
The sidebar also allows you to further customize your forms. You can adjust various stylistic aspects of a form, including background color, font color, border size, and more. Plus, you can turn ActiveCampaign branding on and off with the click of a button.
Note: Lite plans cannot remove ActiveCampaign branding on forms.
Additional Form Settings
The last tab on the sidebar is just as valuable as the first two. By clicking on the “Options” tab, you can customize the “Thank You” message that appears to contacts when they submit information to a form. Or, if you prefer that contacts be redirected to a different webpage after submitting data to a form, you can configure that setting as well.
Now, if you recall when we first created this form, we decided that ActiveCampaign would automatically subscribe contacts who fill the form out to a “Prospects” list. You’ll notice that that action now appears in the sidebar menu.
You can add additional form actions by clicking the “+ Add an action” button, just as you can do when creating a form from the main forms page. If the form action you’re configuring is “Subscribe to List,” you have some additional flexibility compared to the three other form actions.
Clicking on the pencil icon to the right of the list brings up additional opt-in settings.
The setting you configure in the “Edit Form Action” screen is your opt-in confirmation. Opt-in confirmation ensures that contacts who fill out your forms actually want to subscribe to your list. Turning the feature on tells ActiveCampaign to send a message to all contacts who submit information to that form, giving them an opportunity to confirm their interest and email address by clicking on a link in the email sent to them. Opt-in confirmation helps maintain respectable deliverability rates.
If you turn on “opt-in confirmation,” then contacts who submit data to that form are considered “unconfirmed” until they confirm their interest by responding to your confirmation email. If you turn “opt-in confirmation” off when editing your form, then our platform automatically considers contacts who submit information to that form as “active.” On the surface, that seems great. More active contacts are more prospective leads to you. But the risk in taking that route is that contacts may not want to receive messages from you, even if they fill out a given form. They could then mark you as spam and hurt your deliverability.
Note: In ActiveCampaign, opt-in confirmation is configured at the form level, as opposed to platforms where opt-in confirmation is configured at the list level. That means contacts can bypass opt-in confirmation and be added directly to an ActiveCampaign list via third-party applications without confirming their email address, even if you have opt-in confirmation turned on for your forms. Contacts who enter your database that way are automatically considered active, which means you can take full advantage of our features such as site tracking.
The “Edit Form Action” window empowers you to turn opt-in confirmation off and on. (We suggest opt-in confirmation for all subscriptions, but there are exceptions. For example, your form could register people for an event, and you are not planning on sending them future emails, or perhaps you’re advanced and are handling reachability by yourself). From that window, you can also preview the opt-in email, and you can edit it. Clicking “Edit” will take you right to our email builder. If you choose to edit the email, you can return to the form simply by clicking “Return To Form” in the upper left corner of the email builder.
Note: Confirmation emails are accessible only through the form they are configured with. They do not display in reporting or templates like standard email campaigns. That way. you’ll never associate a confirmation email with the wrong form.
The “Confirmation Action” seen in the “Edit Form Action” window refers to the message you want to send to contacts who confirm that they want to subscribe to your list. Selecting “Show Message” sends contacts to a URL with a thank you message that you can customize. As an alternative to “Show Message,” you can redirect contacts who confirm to another URL of your choice.
The address in the “Edit Form Action” window appears in the footer of your opt-in confirmation email.
Lastly, the options tab has an “Advanced” section. In that section, you’re able to decide if blank fields that contacts submit to forms will overwrite the data that those same contacts previously entered in those fields. For example, say Tim filled out your form today and entered his phone number as 555-5555, and then a few days from now, he resubmitted data to that same form but left the phone number field blank. Whether or not you check the box in the “Advanced” section determines if ActiveCampaign stores Tim’s number as 555-5555 or stores the blank field.
Checking the box results in blank field submissions replacing existing data. Leaving the box unchecked tells ActiveCampaign to store the original data and ignore any blank submissions.
As seen when you hover over the information icon, that feature applies only to certain custom field types:
- Text inputs
- Text areas
- Checkboxes
- Date fields
- Multi-selection lists.
Integrating Your Form
For users to get the most out of ActiveCampaign’s features, such as site tracking, automations, and our Deals CRM, their contacts must be considered active, not unconfirmed, unsubscribed, or bounced.
ActiveCampaign does not send any messages to contacts whose status is unconfirmed. In fact, all you can do with unconfirmed contacts is view their site tracking data. You cannot act on that data. So, if you want to accomplish your ultimate business goals — and you think ActiveCampaign can help you do so — then you want contacts to achieve “active” status as easily as possible. How do contacts become active? They do one of three things:
- Submit information to an ActiveCampaign form
- Click a link in an email you sent through ActiveCampaign
- Added to a list via third-party API
Thus, the more ActiveCampaign forms you set up, the more opportunities prospective contacts have to enter your database and become active.
Once you’re satisfied with your form, you need to integrate it into your web assets, and you have multiple ways to do so. Simply click the blue “Integrate” button in the top right corner of the form editor. Doing so brings up four implementation options, as shown in the below screen recording.
Note: Certain form types will have fewer options available.
1. Embed
You can embed the form directly on your assets, you could share a link to your form, you can integrate your form with WordPress, or you can place your form on Facebook.If you choose to integrate your form by embedding it on your web asset, you can take one of two routes. As shown in the below image, we provide the JavaScript and the code for the full embed.
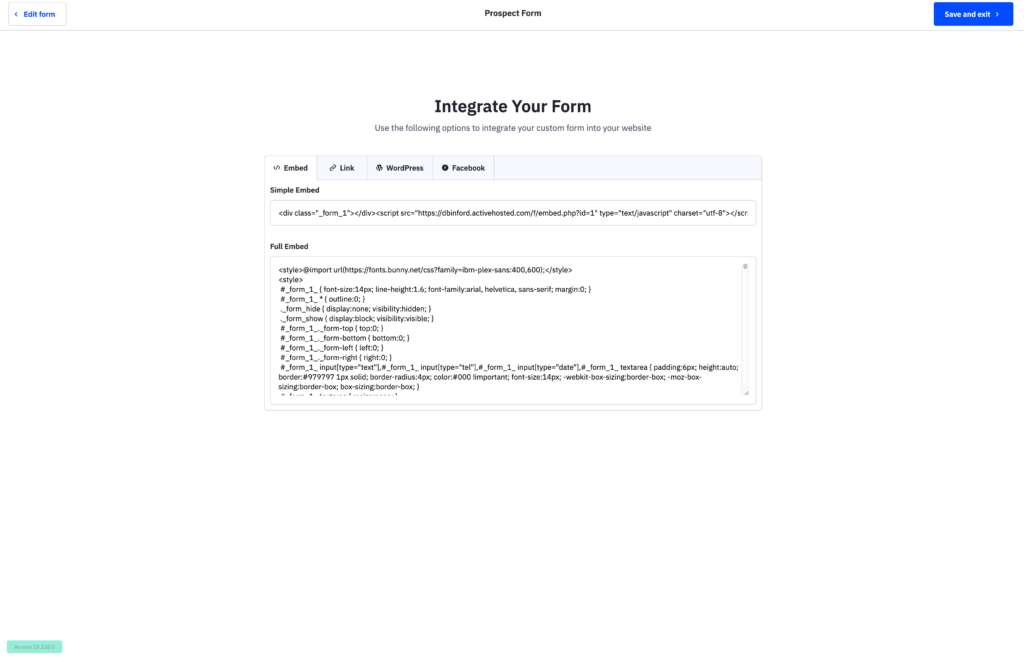
There are benefits to each embed option. If you use the Simple Embed, then any edits you make to the form in ActiveCampaign are automatically reflected in the form you place on your web asset. In a sense, the Simple Embed functions like a mirror.
That is not the case with the full embed. Any edits you make to a form in our form editor are NOT automatically reflected in a form that you integrated via full embed. For changes to be reflected, you have to make edits directly in the full embed code. Typically, the full embed option is reserved for developers who want to have complete control over the form’s creation. Indeed, the full embed option existed before we added the style tab to our form editor, which makes customization easy even for those who don’t code.
With that said, the Simple Embed route is our preferred form integration option. But alternatives exist; another option might be better suited for you and your business.
2. WordPress
We strongly recommend integrating forms via our WordPress plugin if you use WordPress. If you don’t yet have the plugin, simply click the blue “Download Plugin” button, pictured below.
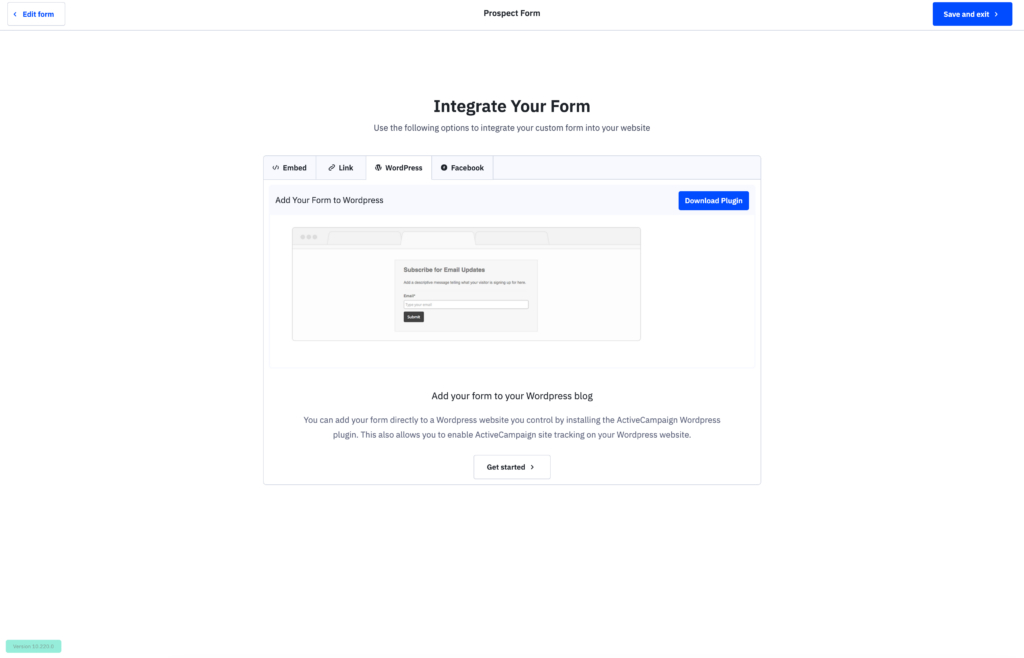
Doing so automatically adds the WordPress-ActiveCampaign plugin to your account, and with that, you can not only easily embed ActiveCampaign forms on your WordPress pages, but also you activate site tracking on your WordPress pages.
3. Link
For people who are unfamiliar with code and are overwhelmed by the idea of embedding forms, we suggest using our “Link” form integration. We will host a URL with your form. Our platform automatically generates the link to the form, and you can simply share it anywhere you choose.
Sharing a link to your form is extremely easy.
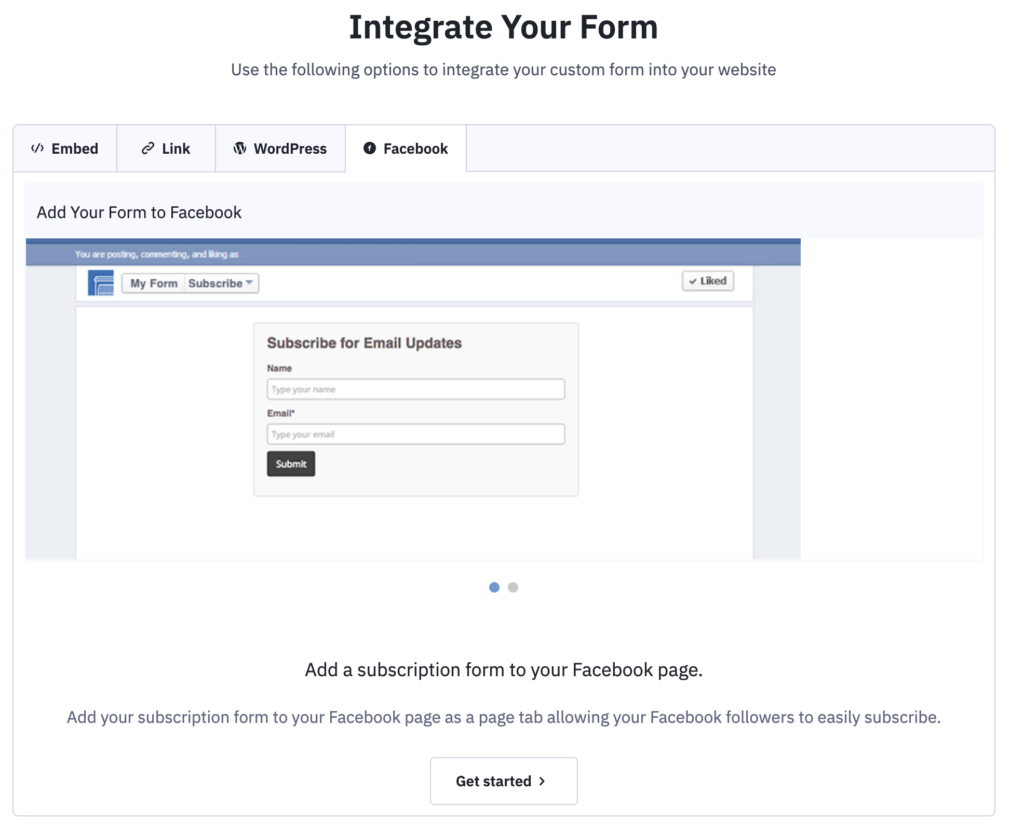
4. Facebook
The fourth and final form integration is doing so on Facebook. As long as you have permission to add apps to the Facebook page – and meet the other criteria mentioned here – adding your newly-created ActiveCampaign form is as simple as clicking the “Get Started” button, shown below.
Closing Remarks
Forms are necessary. They are the primary way that contacts enter your database. You can also choose to use third-party forms to add contacts to your ActiveCampaign account, but remember that automations may be needed to make those contacts active, which you need to reach your business goals.
If contacts aren’t submitting data to ActiveCampaign forms, they have to work even harder to become active contacts in our platform.

