Under the General Data Protection Regulation (GDPR), an organization must be able to justify each type of data processing activity it conducts, using one of six lawful bases of processing.
In email marketing, which involves the processing of contacts’ personal data (such as email address and name), consent often makes sense as the lawful basis used to justify the data processing.
Organizations using consent as a lawful basis for data processing need to be able to prove consent was freely given, and be prepared to share a record of consent with regulators, if asked.
Additionally, data subjects must be able to withdraw consent at any time.
In this guide, we’ll explain consent and show you some examples of how you can update the forms on your website to require GDPR-friendly consent. We’ll also show you examples of how you can prepare to provide proof of consent.
Legal Disclaimer: The information in this guide does not constitute legal advice. This is for informational purposes only, and we strongly encourage you to seek independent legal counsel to understand how your organization needs to comply with the GDPR.
GDPR-Friendly Consent
Lawful consent under the GDPR needs to be both informed and explicit.
Organizations have an obligation to present information about their data processing “in a concise, transparent, intelligible and easily accessible form, using clear and plain language.”
This means:
- An individual must have the opportunity to make an actual choice to provide consent. For example, a pre-checked checkbox on a form does not qualify as consent under the GDPR, because it removes the affirmative action of giving consent. Individuals must check the box themselves to provide proper consent, or click on the confirmation link in an email to confirm that they are opting in to receive your marketing emails.
- The choice to provide consent must be clearly distinguishable and separate from other initiatives. This means individuals can’t be required to give consent as a condition for receiving a resource, product, or service.
You can obtain GDPR-friendly consent from contacts by:
- Using checkbox custom fields in a form that contacts must check in order to provide consent, or
- Creating a form that requires confirmation opt-in.
Let’s take a look at both ways to set up a form that collects GDPR-friendly consent from your contacts.
Consent Forms Using Checkboxes
You can use checkboxes in a lead capture form on your website to get consent from new leads.
Your GDPR-friendly lead capture form should:
- Provide a clear explanation of what information a contact can expect to receive by submitting your form.
- Include a (not pre-checked) checkbox that the contact must check in order to submit the form, agreeing to your terms of service and privacy policy.
- Provide a checkbox to get consent for each business activity you employ that involves the processing of personal data. (Remember that each activity must be clearly distinguishable and requires separate consent.)
- Include links to your terms of service and privacy policy.
Here’s a standard example of a lead capture form that obtains consent through the use of checkboxes:
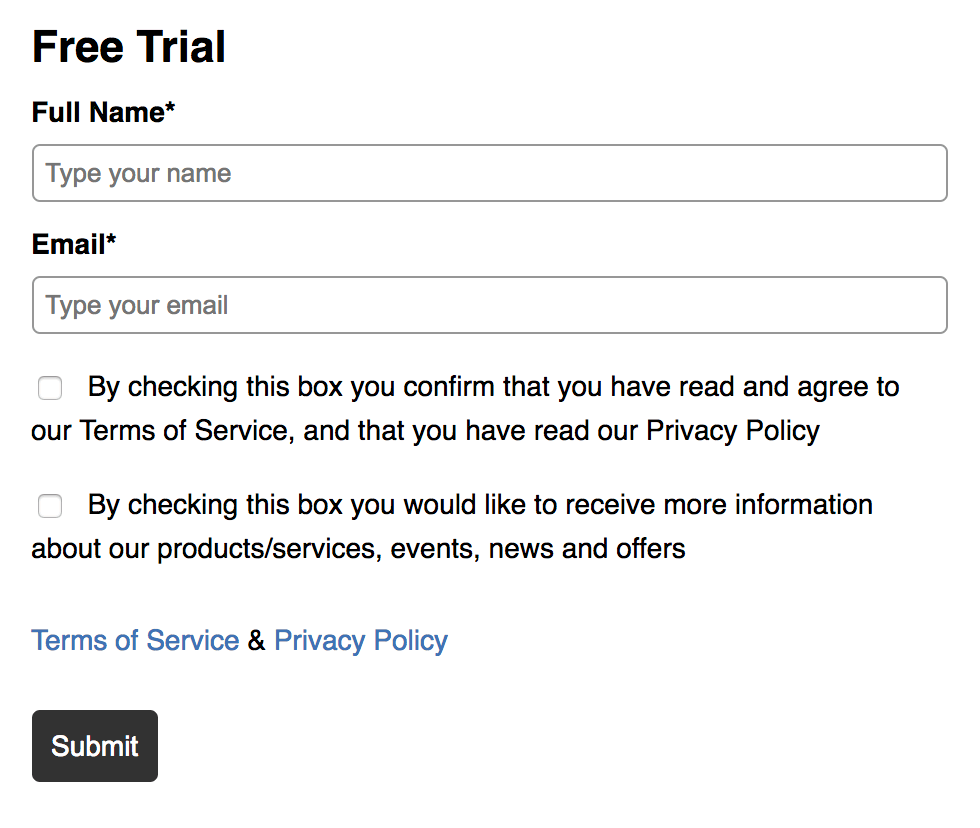
You can use this example as a starting point for your own consent form, but you should consult with your legal team regarding the exact language it uses.
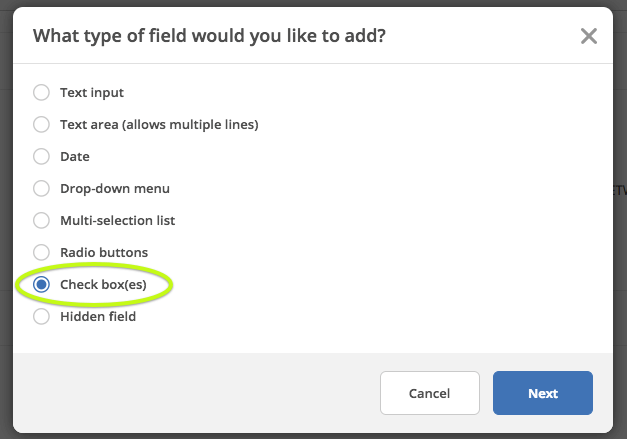
Checkbox Custom Fields
In ActiveCampaign, checkboxes on a form are represented by a custom field. You will have to create a new checkbox custom field before you can add it to your form.
To do this, navigate to “Lists” in the main menu on the left, and click “Manage Fields.” Click on the New Custom Contact Field button and select checkboxes as the type of custom field you would like to create. Click “Next” to continue.
Give your custom field a name and type in the text you’ll use for each checkbox option:
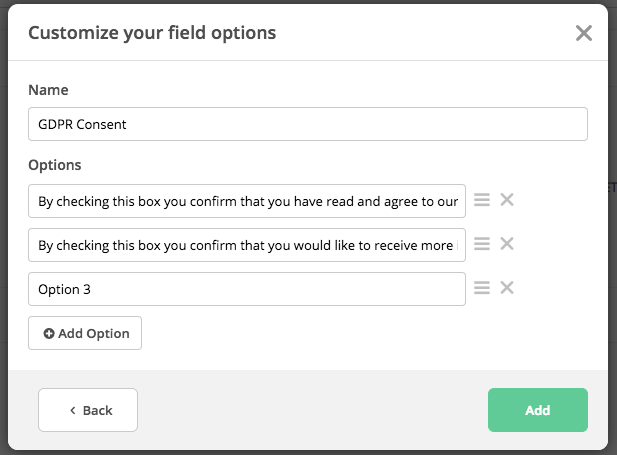
Click “Add” to finish.
For more help creating a new custom field in ActiveCampaign, check out our Help article.
You can also choose to make any field on your form required in order to submit the form. Here’s how.
Consent Forms Using Confirmation Opt-In
You can use a confirmation opt-in form instead of or in addition to a lead capture form that uses checkboxes, depending on your needs. Confirmation opt-in forms are useful when you would like to allow new contacts to opt into your email marketing list.
Confirmation opt-in (also known as double opt-in) is the process of allowing a contact to subscribe to your email list by providing their email address, then sending a confirmation email to that contact. The contact must click on the link provided in the email to confirm their opt-in before being added to your list.
The easiest way to get consent from your contacts is by always having confirmation opt-in turned on for all of your forms. If a contact hasn’t clicked on your confirmation link, they’ll exist on your email list as an Unconfirmed contact. When you email a list, your emails only go to the contacts who are Active, so you can’t email any Unconfirmed contacts in ActiveCampaign.
By default, confirmation opt-in is turned on for all ActiveCampaign forms. To learn more about how it works, and how to customize your confirmation opt-in message, read our guide.
You can filter your email list by contact status to see how many Unconfirmed contacts are on your list. Check out this Help article to learn how.
Collect GDPR-Friendly Consent from Existing Contacts
Now that you’ve updated all of your existing forms, you’re ready to collect GDPR-friendly consent from any new contacts who visit your website and submit a form.
But the work’s not over yet! You should also take steps to get consent from your existing contacts. If the consent you’ve been collecting did not qualify as lawful consent under the GDPR, you may have to ask for consent again using your updated forms in order to achieve GDPR compliance.
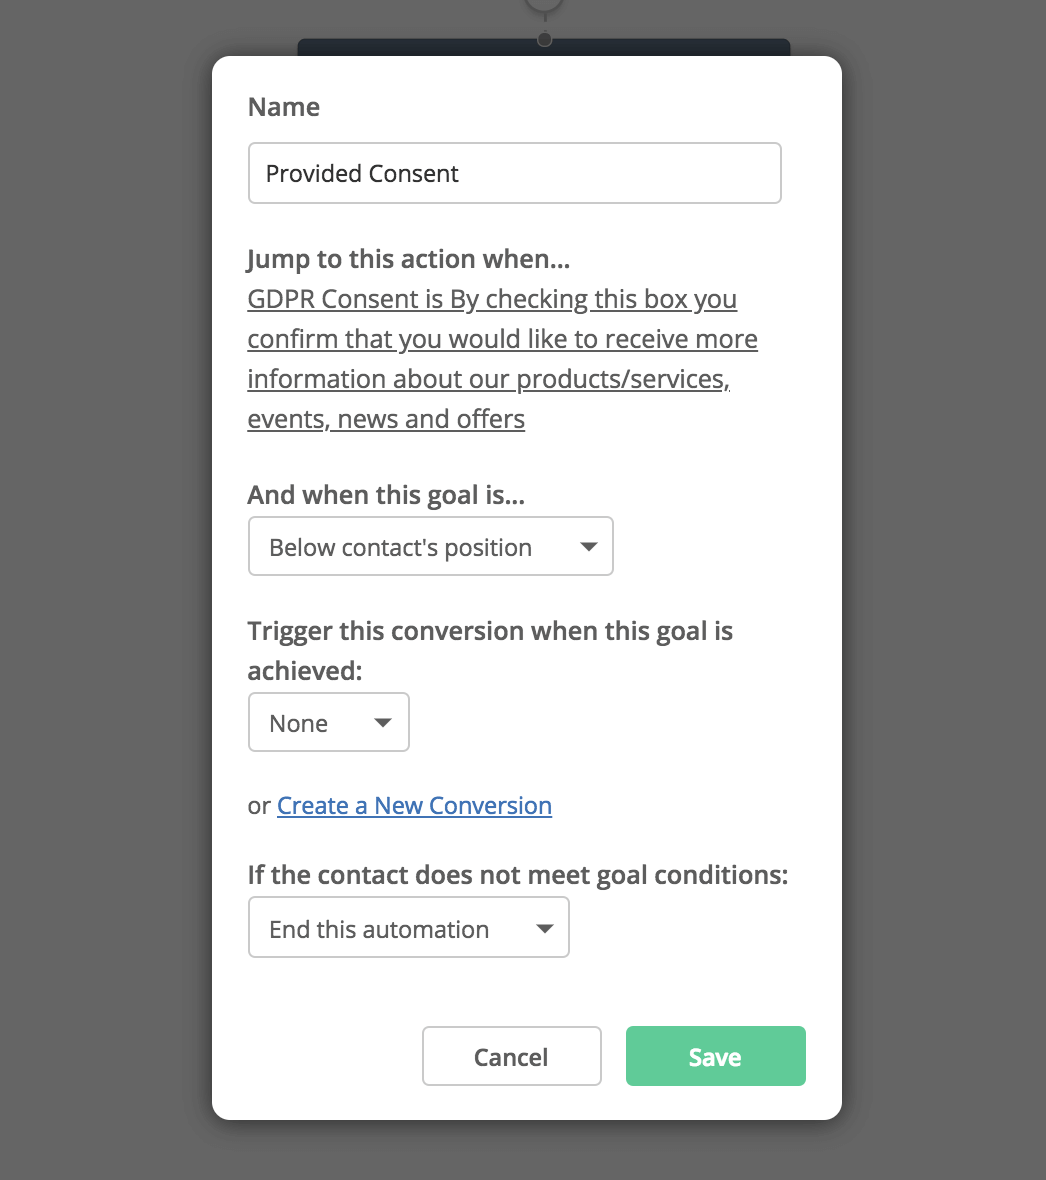
If you’re using a consent form that uses checkboxes, you can do this by adding the contacts you need consent from to an automation that employs a Goal: Provided Consent. The idea here is that in order to achieve this Goal, contacts must submit the form with the necessary checkbox(es) checked.
For instance, returning to the example form we showed you above, a Goal action configured for when a contact has checked this checkbox…

…would look like this:
And the rest of the automation might look something like this:
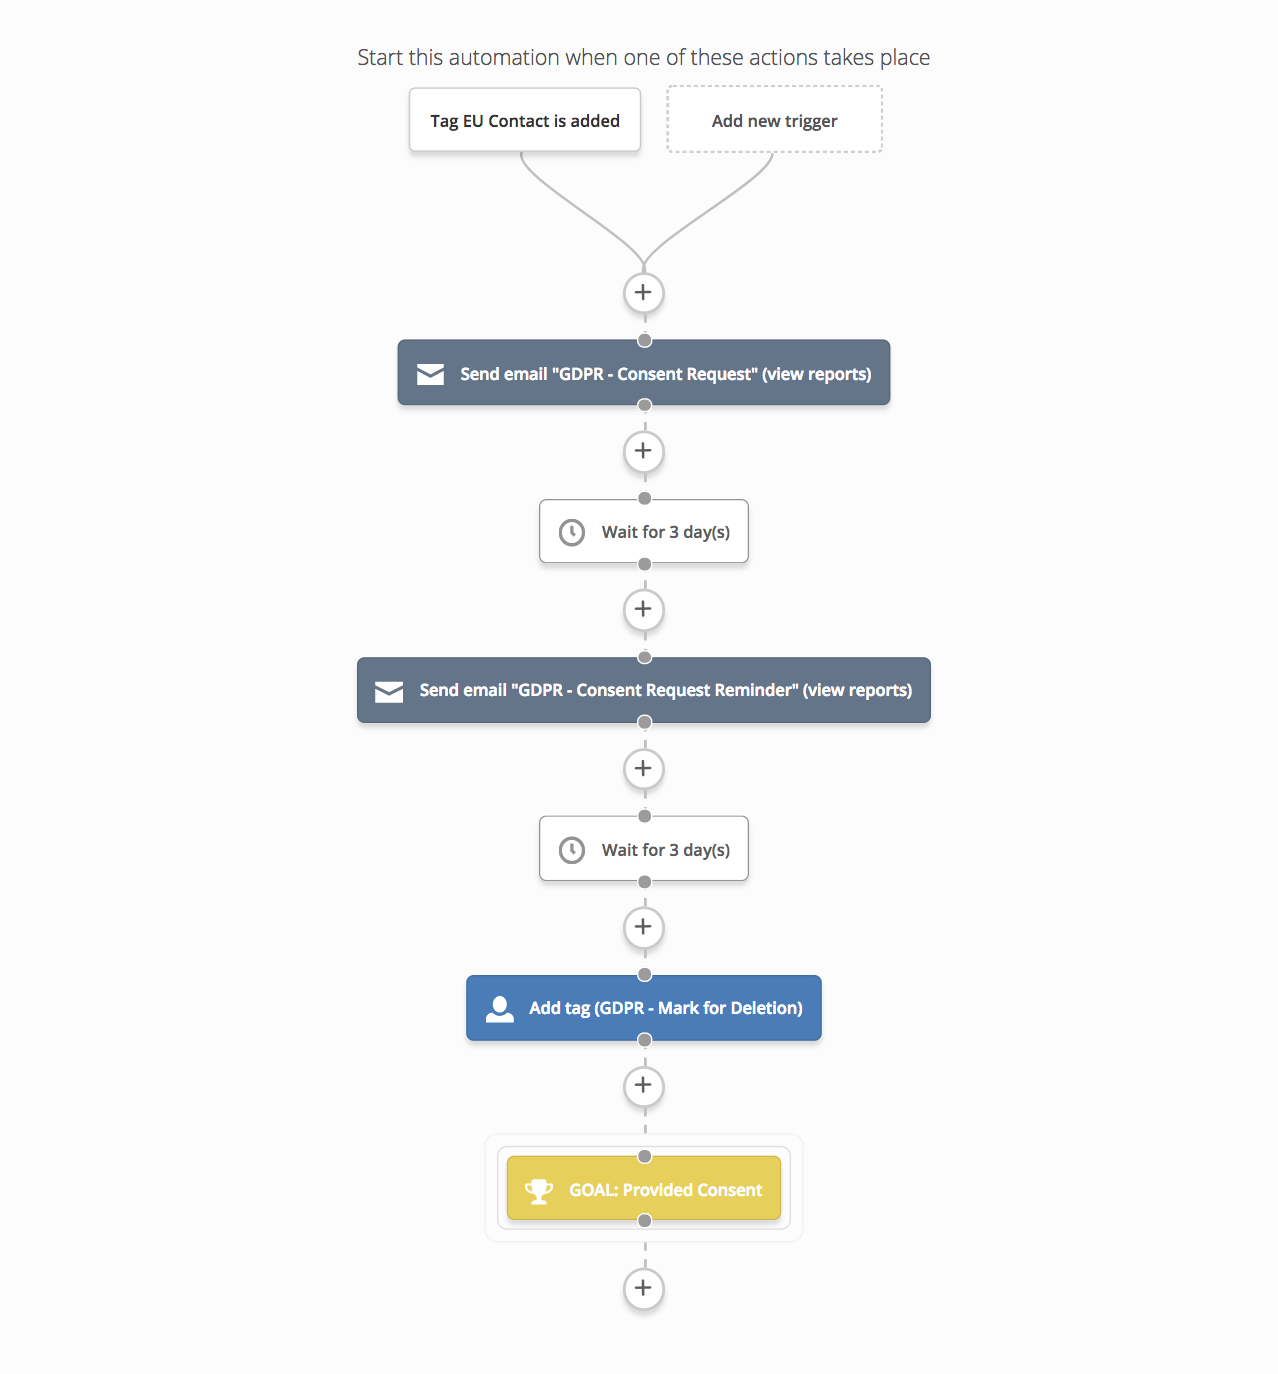
In this example, the automation sends an email containing a link to the form once the “EU Contact” tag is applied to a contact (more on this tagging process below).
If the contact does not meet the goal of “Provided Consent” after three days, the automation sends an email reminder.
If the contact still does not meet the goal after another three days, the automation applies another tag to the contact, “GDPR – Mark for Deletion.”
From here, you might choose to unsubscribe contacts who have the “GDPR – Mark for Deletion” tag after a certain period of time, or create a segment group that you don’t contact.
“EU Contact” Tagging Process
After you create your automation and turn it to Active, you can add your European Union-based contacts to your automation and begin the process of collecting consent.
To do this, perform an advanced search to segment your contacts based on their country. Then, apply an “EU Contact” tag to the contacts in your search results. Read our Help article for step-by-step instructions.
Once the “EU Contact” tag is applied, contacts will begin to enter your automation.
Note: As a precaution, you may want to consider collecting consent from ALL of your existing contacts. If you choose to do this, you can use the bulk edit feature to manually add contacts to your automation.
Record Proof of Consent
Now that you’re set up to collect GDPR-friendly consent from all new and existing contacts, you can prepare to collect proof of consent so that you’re able to provide it if requested.
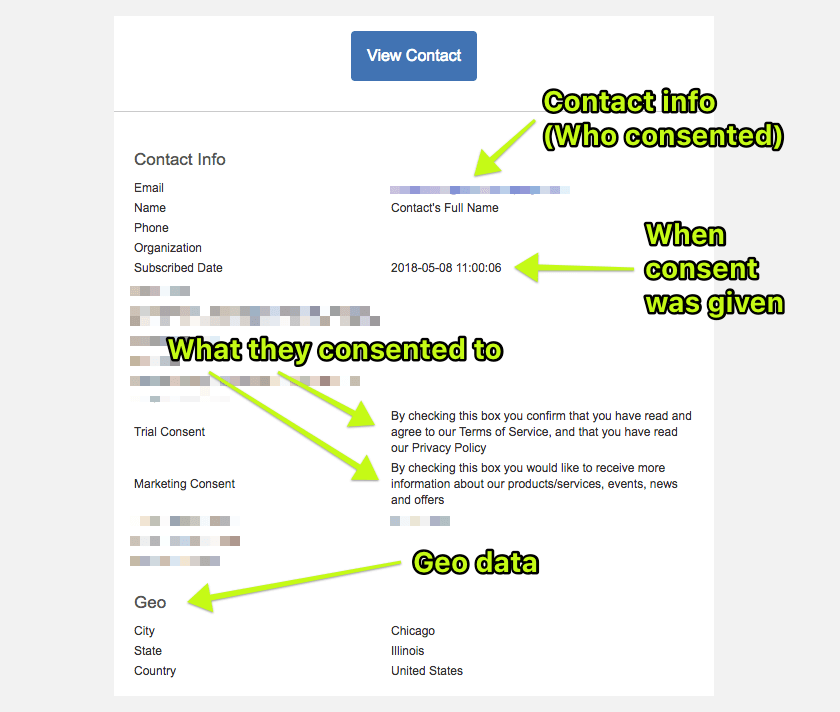
Proof of consent requires a record of who gave consent, when they gave it, and what specifically they consented to.
In ActiveCampaign, you can be prepared to provide all of this information by configuring your form to send you a record of each contact’s form submission.
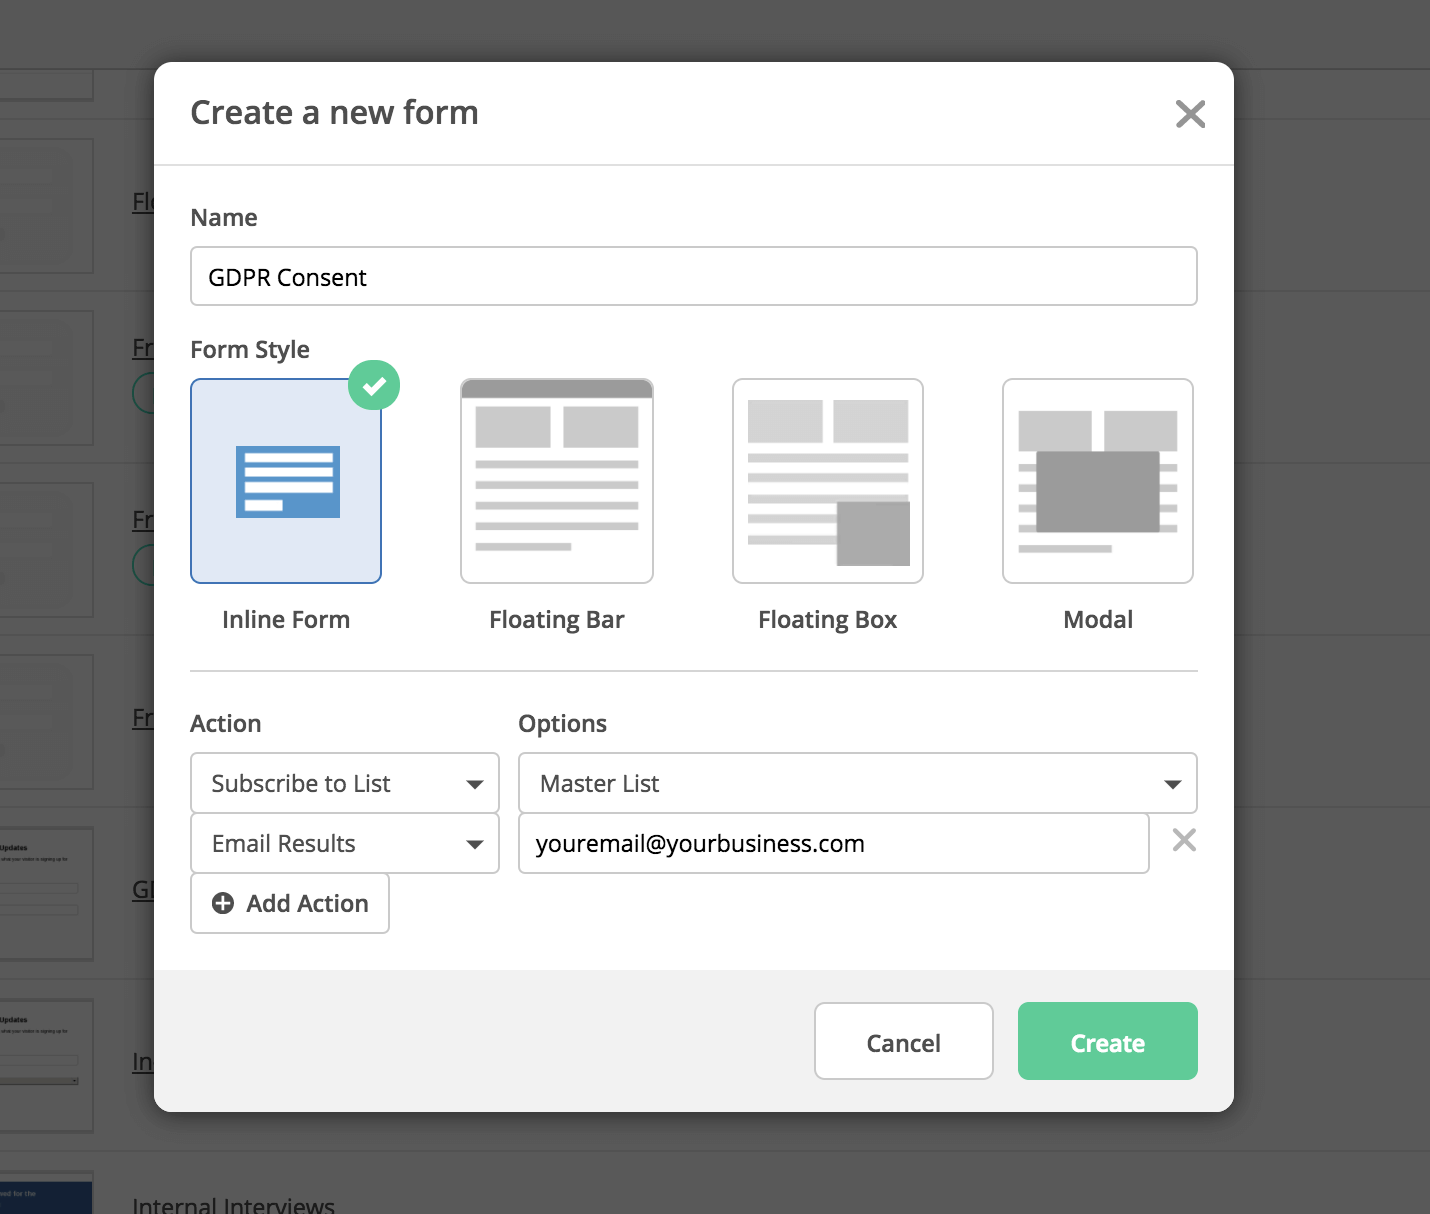
Receive a Copy of Consent Form Submission
To receive a copy of all consent form submissions, simply add an “Email Results” action to your consent form, and add your email address to the Options field:
Now every time a contact submits your form, you will receive an email containing a record of the form submission results, allowing you to see the date consent was given, who filled out the form, and what specifically they consented to:
Confirmation Opt-In Forms
If your form uses confirmation opt-in, the contact will have to click on the link in the confirmation email they receive before you receive your own copy of their form submission. If a contact submits your form but never clicks on that confirmation link, you will not receive a copy of their form submission.
Additionally, because the proof of consent is in the confirmation email that is sent to the contact, you’ll need to take an additional step for forms that use confirmation opt-in: You will need a screenshot of the confirmation email message that is sent to contacts.
To grab a screenshot, navigate to the Forms section of the platform and click the Edit button next to your form. Open the Options tab in the menu on the right, and click the gear icon:
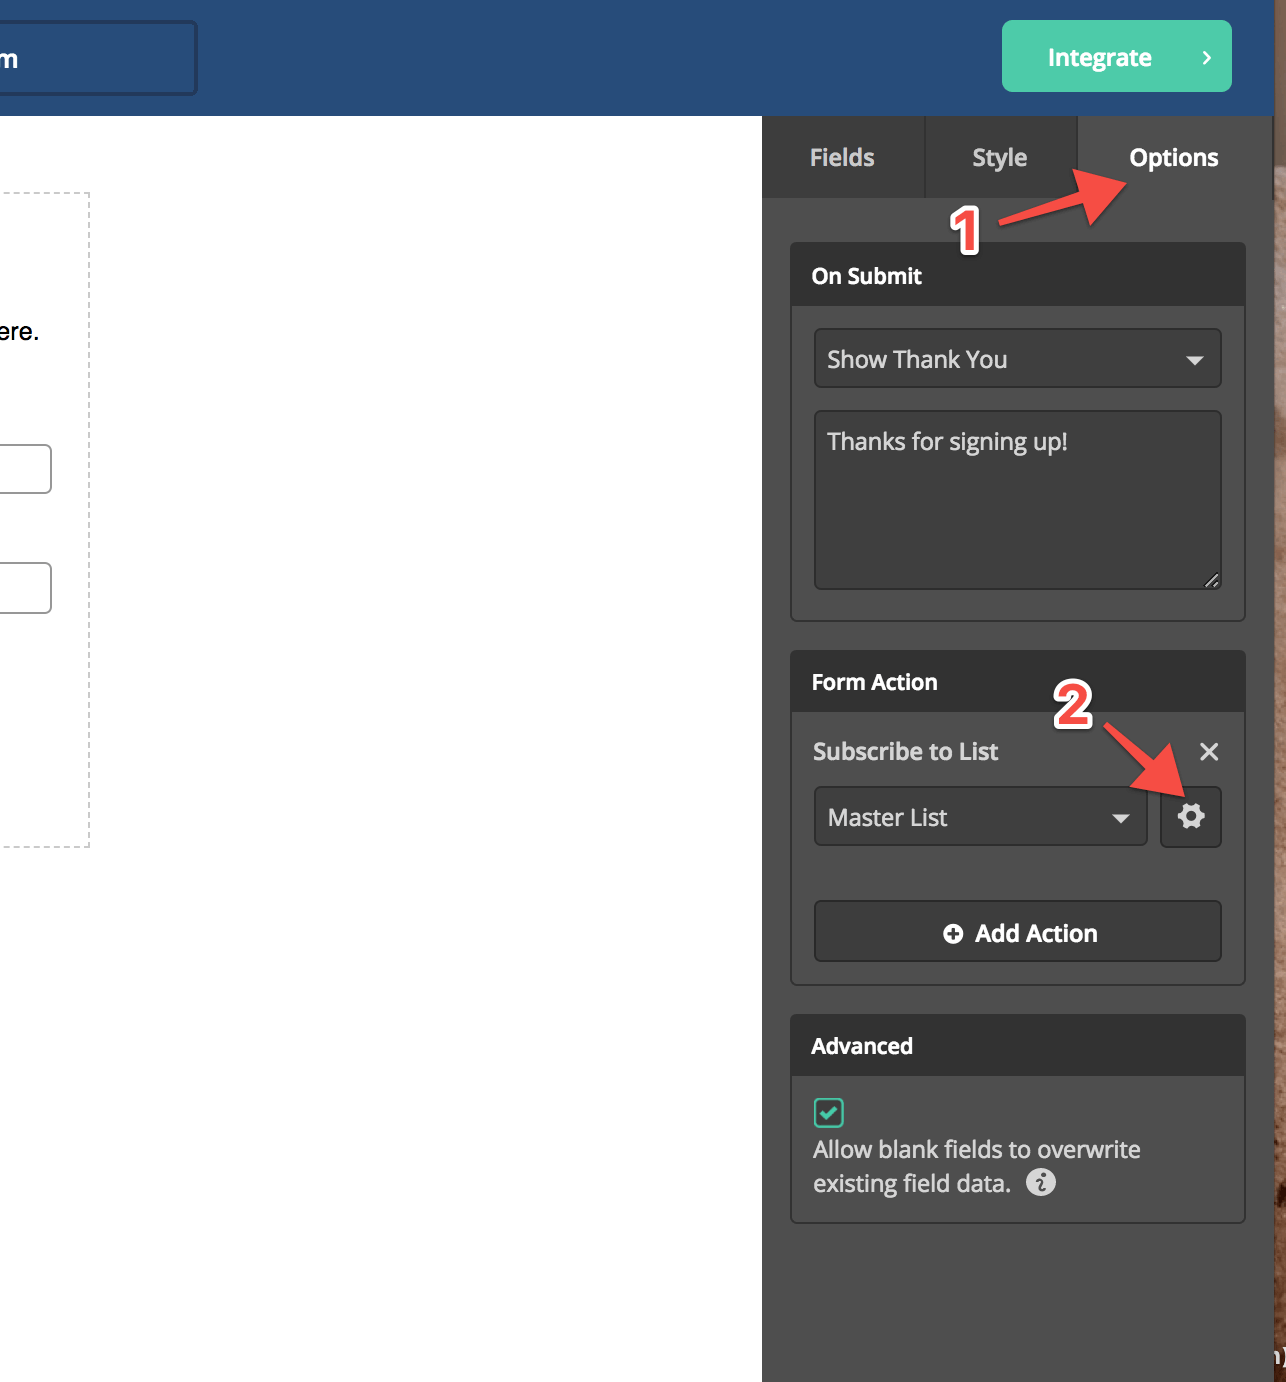
In the “Edit Form Action” module, click the Preview button to view a preview of the confirmation email that is sent to contacts who fill out the form. If you ever need to provide a record of the double opt-in messaging you use to collect consent, you can take a screenshot of this preview email.
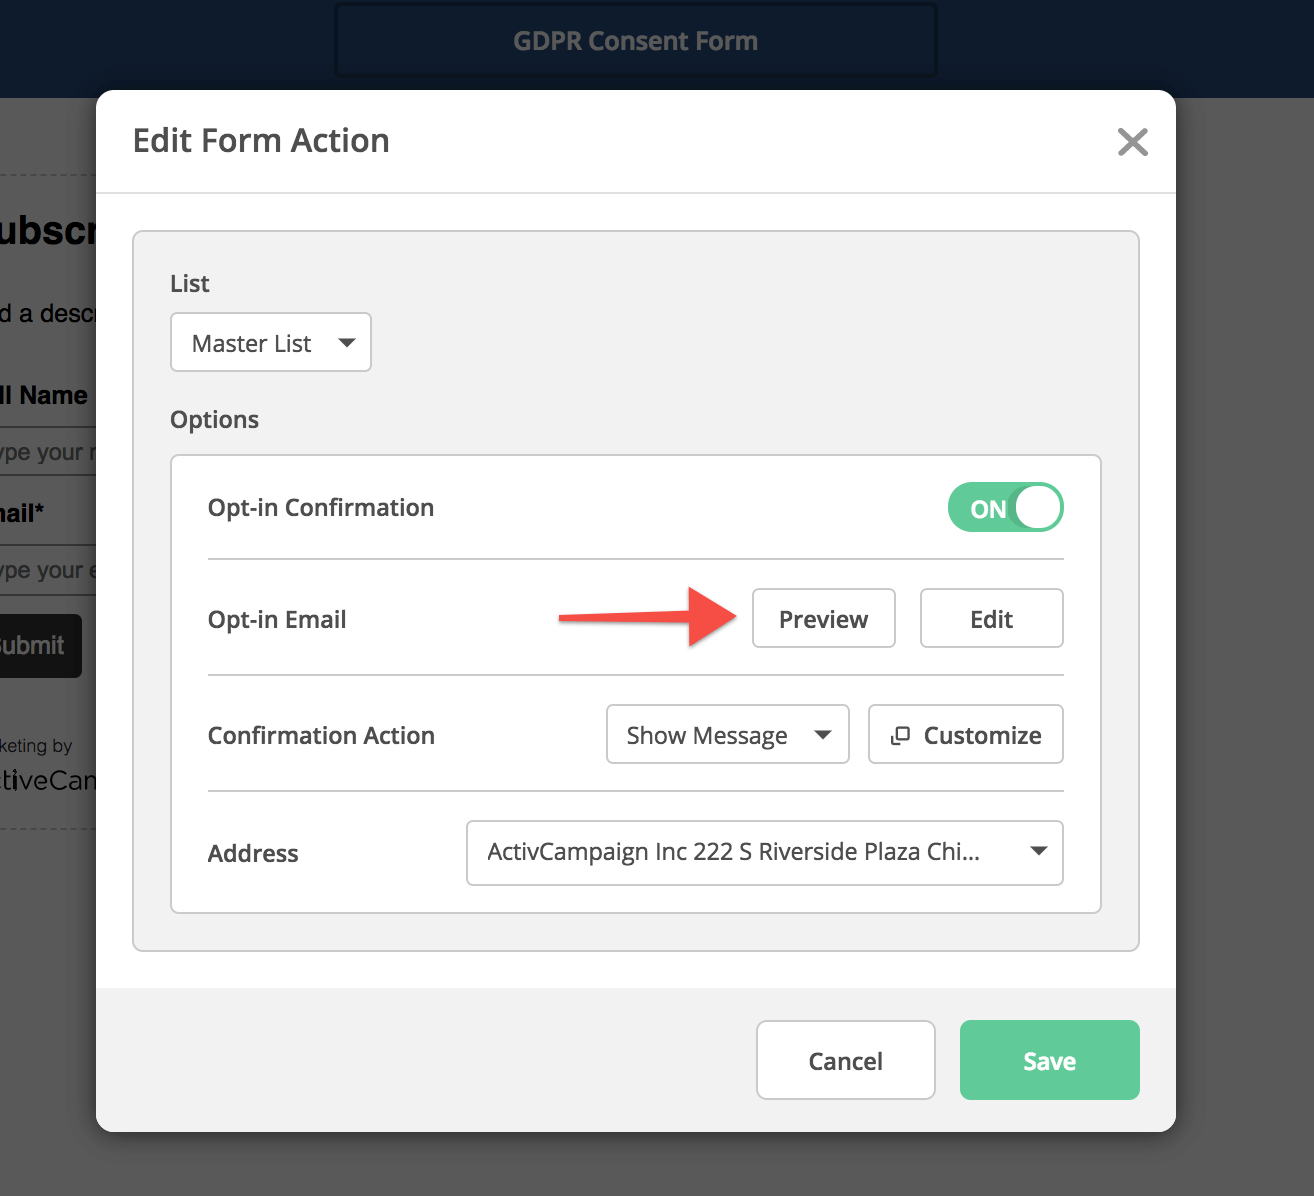
Note: If you ever make changes to the confirmation email, remember to take a new screenshot of the updated preview, so your records remain up-to-date.
Record Date of Consent
In addition to keeping copies of consent form submissions, you may want to create an automation that timestamps the date of consent for each form submission. This is useful data to have in your ActiveCampaign account because it will help you collect consent again in the future, and help you prove that you collected proper consent before you started processing personal data.
You can record date of consent by creating an automation that populates a custom date field when a contact either:
- Checks a checkbox on your consent form (if your form uses checkbox custom fields), or
- Clicks the confirmation link in your confirmation email (if your form has double opt-in turned on)
This way, you’ll have an in-platform record of the date that all of your contacts gave consent, and will be able to segment contacts by this data.
Example 1
Here’s an example of what that automation might look like for a consent form that uses checkboxes:
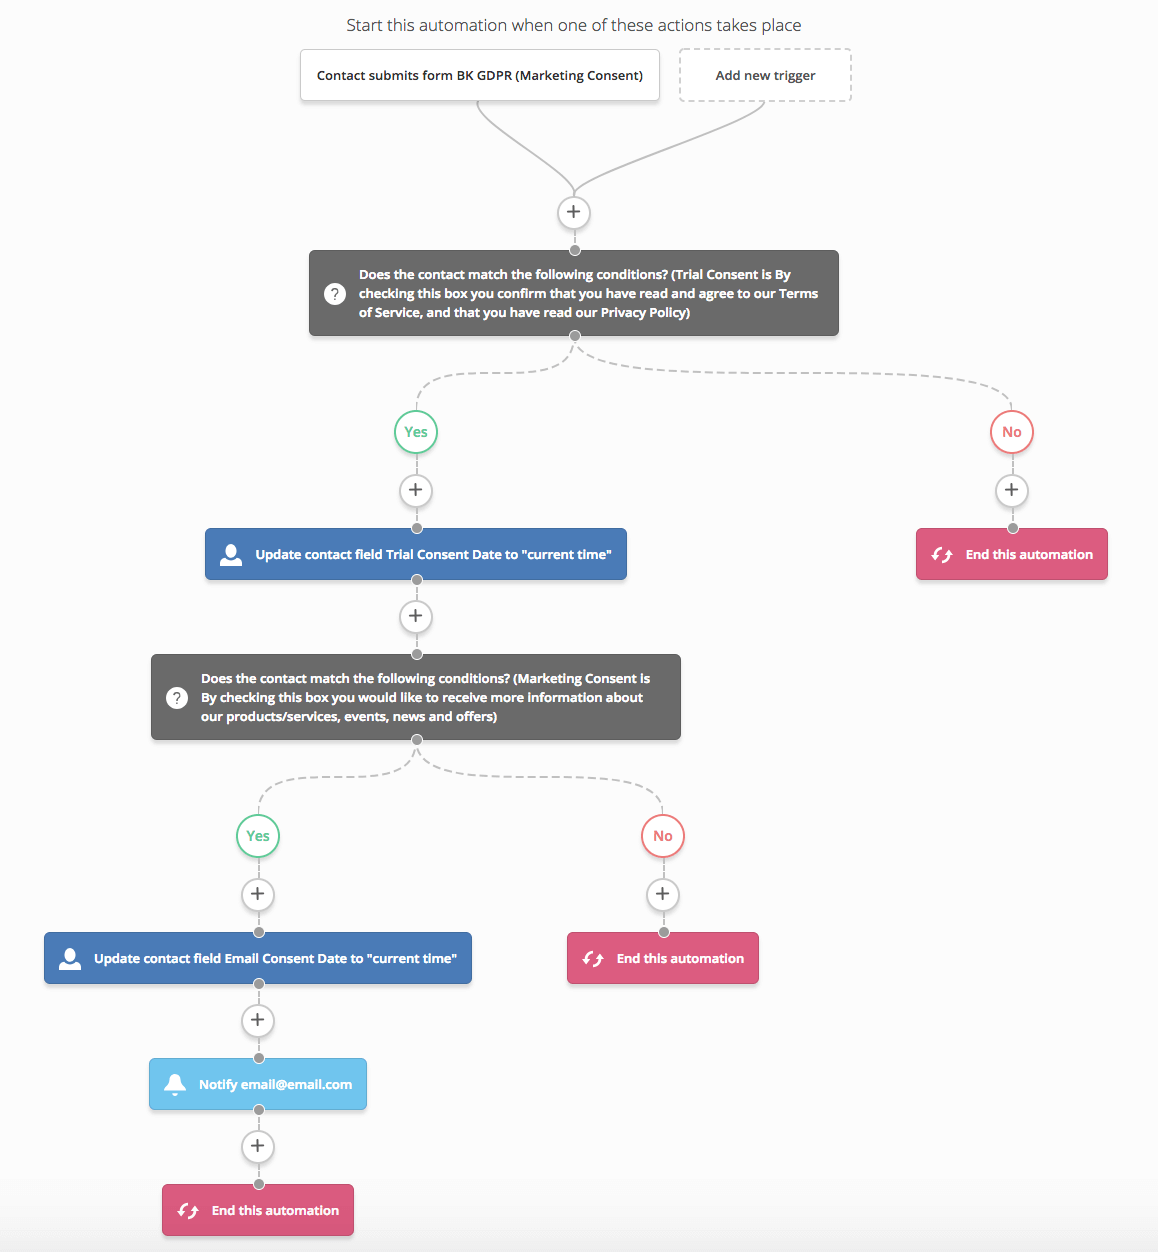
In this example, we’ve again used our checkbox form:
When a contact submits this form, the automation first checks to see if the contact has checked this box:

If the contact has not, it sends them down a path that ends the automation.
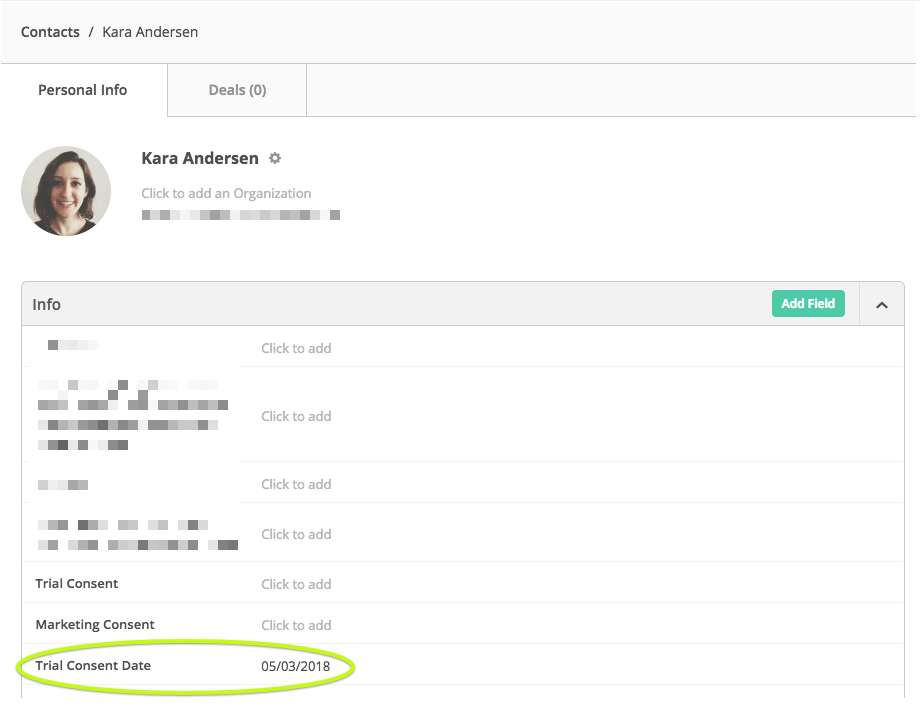
If the contact has, it sends them down a different path that applies the current date to a custom contact field called “Trial Consent Date.”
This provides a record of the date the contact confirmed they have read and agreed to the Terms of Service. You’ll be able to view this information under the custom contact field in the contact’s profile page:
The automation then checks to see if the contact has checked the second box:

If the contact has not, it sends them down a path that ends the automation.
If the contact has, it sends them down a path that first applies the current date to a custom contact field called “Email Consent Date.” This provides a record of the date that the contact provided consent to receive marketing emails.
The automation then sends an internal notification email to a team member, alerting them that the date consent was given has been recorded.
Example 2
Here’s an automation example of how you can record the date of consent for a form that uses confirmation opt-in:
In this example, once a contact opens their confirmation email and clicks the link to confirm, the automation updates that contact’s “Email Consent Date” field to the current date.
Additional Resources
To learn more about what you can do to prepare for the GDPR, listen to our podcast episode, and check out our Help article on setting up GDPR-friendly site tracking.
To learn more about what ActiveCampaign is doing to ensure GDPR compliance on our end, visit our GDPR updates page.