Form Integration: Segmented Welcome Emails Automation Recipe
Send new contacts the content they want and need. This automation lets you send new contacts a tailored welcome email or welcome email series.
When a contact subscribes through an integrated form -- like a Typeform form or Unbounce form -- you can track contacts' submissions in each field, then automatically send them the welcome email with the most relevant content and messaging.
Welcome emails have higher open rates than any other marketing emails because your contacts are expecting to hear from you!
You can segment your welcome email or welcome email series based on any field submission, including:
- Age
- Location
- Gender
- Referral source ("How did you hear about us?")
- Purchase intent
- Interest in a certain product or service
- Budget
- Pain points
For example, if you know your contact is local to your business, you can send them a welcome email with information on upcoming events. If a contact lives farther away, it makes more sense to share online content or an ecommerce landing page.
This automation works with form integrations like Typeform and Unbounce. Before importing this automation, make sure you have your form integration set up and your subscription form integrated with your ActiveCampaign account. To segment based on your contacts' responses, you'll also need to map the form fields to custom fields in ActiveCampaign.
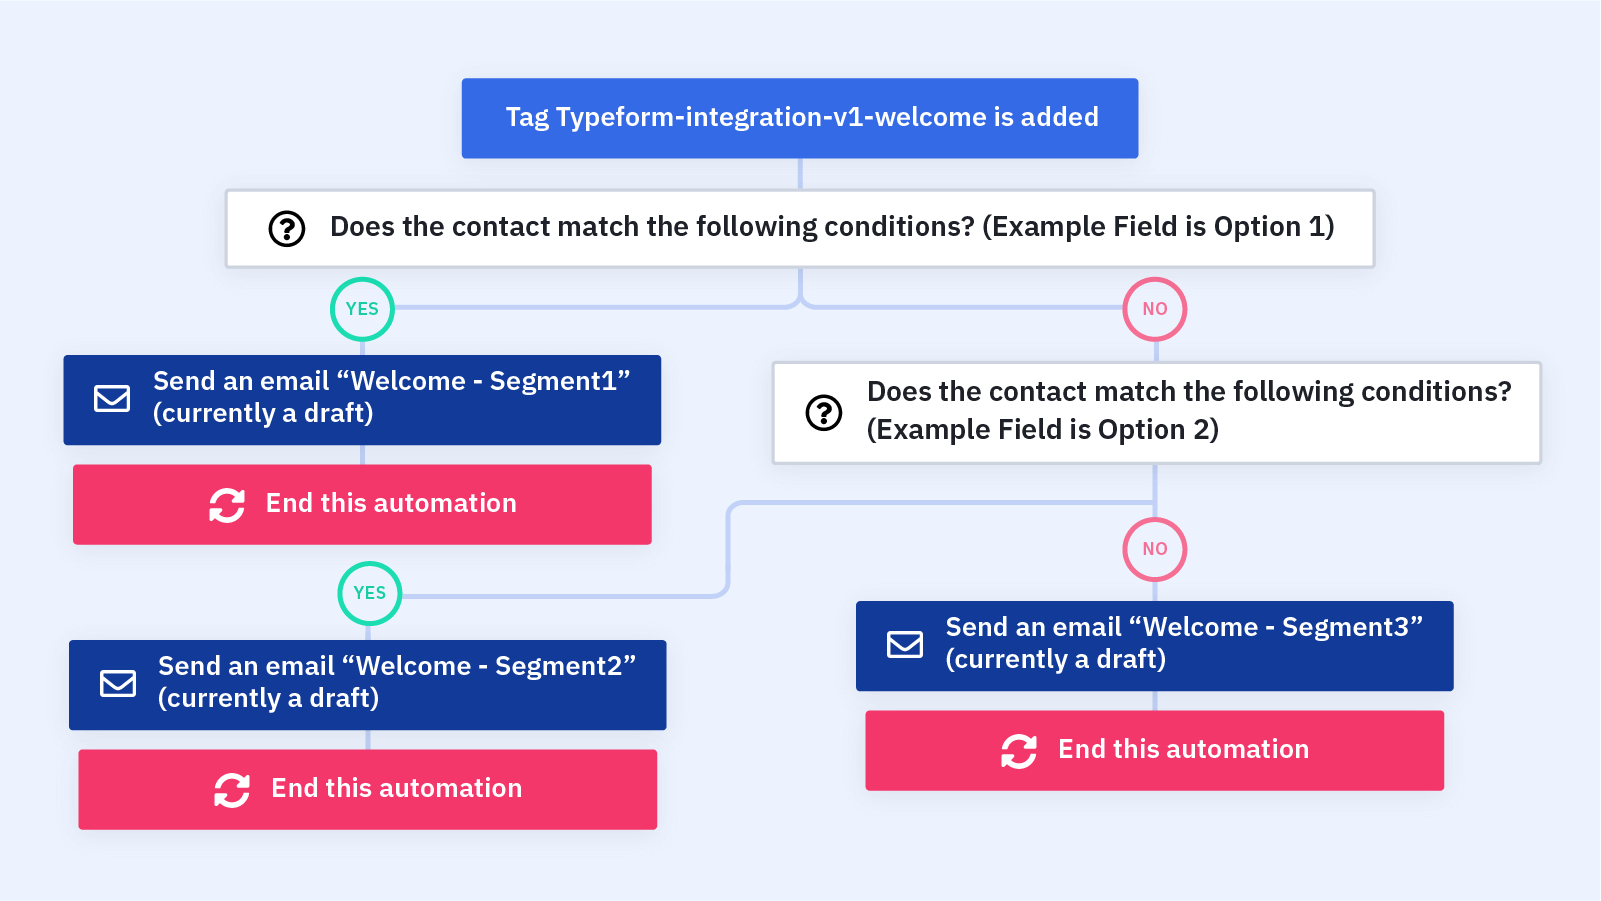
Here's how the "Form Integration: Segmented Welcome Emails" automation recipe works:
1. The automaton is triggered when a contact submits your integrated form and is assigned a corresponding tag. Our example uses Typeform, but you can adjust the trigger based on your form integration. You can also add an "Isn't Subscribed to Master List" segment to this trigger to make sure that only new contacts enter the automation and receive welcome emails.
2. An If/Else condition checks to see whether or not the contact chose a specific option in the field you're segmenting by. In our example, we segment based on just one field and check for Option 1 in this step, but you can build out more conditions to personalize your welcome emails even more.
3. If the contact chose Option 1, the automation sends them a welcome email with tailored content based on that response. You can build out more actions after the first email to create your own welcome series.
4. If the contact did not choose Option 1, an If/Else condition checks to see whether or not they chose Option 2.
5. If the contact chose Option 2, the automation sends them a welcome email with tailored content based on that response. You can build out more actions after the first email to create your own welcome series.
6. In our example, we only offer contacts 3 options for the field we chose to segment by. (If you have more options for contacts to choose from, you can build out more If/Else actions and welcome emails.) If the contact did not choose Option 2, we can assume they chose Option 3, so the automation sends them a welcome email with tailored content based on that response. You can build out more actions after the first email to create your own welcome series.
7. The automation ends.
Share recipe
Get started today
Try it free. No credit card required. Instant setup.
