Did you know that WordPress powers 43.1% of all websites on the internet and has been the fastest-growing blogging platform since 2014? WordPress is synonymous with supporting web content like traditional websites, forums, online stores, media galleries, and blogs.
And did you know? Businesses that run blogs as part of their marketing strategy have conversion rates 6X higher than their competitors.
Creating blog content doesn’t just benefit your conversion rates; it can have a massive impact on your site’s SEO, helping you climb rankings and reach a wider audience. If you’re ready to set up your own blog on WordPress, you’ve clicked on the right article. We’ll walk you through a six-step guide on how to set up a blog on WordPress step by step so you can follow along and create yours without worry.
FYI: This blog is part of our WordPress 101 series that will cover the basics of marketing with WordPress from start to finish. We’ll share tips and best practices as you set up your website and begin thinking big picture about how you want to market your brand. Stay tuned for 102 and beyond for a comprehensive walkthrough of one of the most popular CMS platforms in the world.
What do you need to set up a blog on WordPress?
Setting up a blog on WordPress is a fairly straightforward process, but it’s important to first zoom out and see a complete view of the steps you’ll need to take beforehand, which will set you up for success. We’ve put together a step-by-step guide that takes you from choosing a domain host to writing your first post. Along the way, we’ll include visuals so you can see exactly what we’re doing for each step.
In order to create a blog on WordPress, you’ll need three things: a domain name, a web host, and roughly 20 minutes to get things rolling. Luckily, the setup process is pretty straightforward, and we’ll take you through the six-step guide to set up everything properly.
In order, these are the steps we’ll be following:
1. Choose a web host and domain name
2. Install WordPress blog software
3. Log in and select a theme
4. Write your first post
5. Install WordPress plugins
6. Promote and monitor your blog
If you’re ready, let’s get started.
Choose a web host and domain name
To begin, the first step is choosing a blogging platform. It’s a good thing you chose WordPress because not only is it one of the most popular and reliable blogging platforms available today, but it’s also open-source, meaning it’s completely free to use. The only paid elements you’ll need during this setup process are a domain name and web hosting.
Note: You may see wordpress.org and wordpress.com as you begin signing up. They have a start distinction between them.
WordPress.org is the self-hosted version where you buy your domain and hosting and control it 100%.
WordPress.com allows you to use their hosting, and you can get started for free. It has a lot more limitations than the self-hosted option, even if you’re paying the top tier, but it’s a lot more user-friendly.
If you’re only dipping your toe and not ready to pay for a yearly domain name just yet, WordPress allows you to sign up for free without a domain name and still grants you access to their library of themes, unlimited pages/users, and more.
Keep in mind that instead of a clean domain name like sesameroadbakery.com, you’ll have something along the lines of sesameroadbakery.wordpress.com. If that’s no problem, the free version is the best option to start out.
If you want to customize your domain name, you have two options. You can sign up for a paid plan directly with WordPress and claim your domain name free for the first year (paying after that year is up), or you can buy a domain name and web hosting before signing up for WordPress.
☑️ Your domain name is your blog’s address. It’s what people type to get to your website (www.activecampaign.com)
☑️ Web hosting is where your website lives. Think of it as your site’s home on the internet. Every single blog will need web hosting.
One of the most popular web hosting companies is Bluehost. It’s one of the oldest web hosting companies on the internet and is also largely associated with WordPress web hosting, working together since 2005. Plus, it’s more user friendly and intuitive, making it a great choice for beginners.
There are a few reasons why Bluehost is the recommended web hosting company that many successful bloggers choose. Here’s how it stands out among other companies:
- Free domain name upon sign up: When you sign up for Bluehost, you automatically get a free domain name with the web hosting capabilities you’re paying for. This is a great benefit, as many hosting companies require you to pay for your domain name separately.
- Affordable: Bluehost is a great option if you’re looking to save on both hosting and your domain name. As we said, your domain name comes with the price of WordPress web hosting (just $1.99/month for the first year).
- Great features to start out: Even the starter plan has a range of features you can use as you get accustomed to blogging.
- Easily install WordPress: Bluehost’s close ties with WordPress make it easy to install their blogging software and get your blog up and running with a few clicks.
If you choose Bluehost for your web hosting needs, it’ll cost you around $30 to run your blog for the first year. This includes your custom domain name!
While there are free options, if you plan to launch a robust blog and rely on additional functionality to build your reputation, this price is well worth the investment.
Signing up for WordPress hosting with Bluehost
Ready to sign up? To begin, go to Bluehost’s website and navigate to their WordPress hosting pricing. It should look something like this.
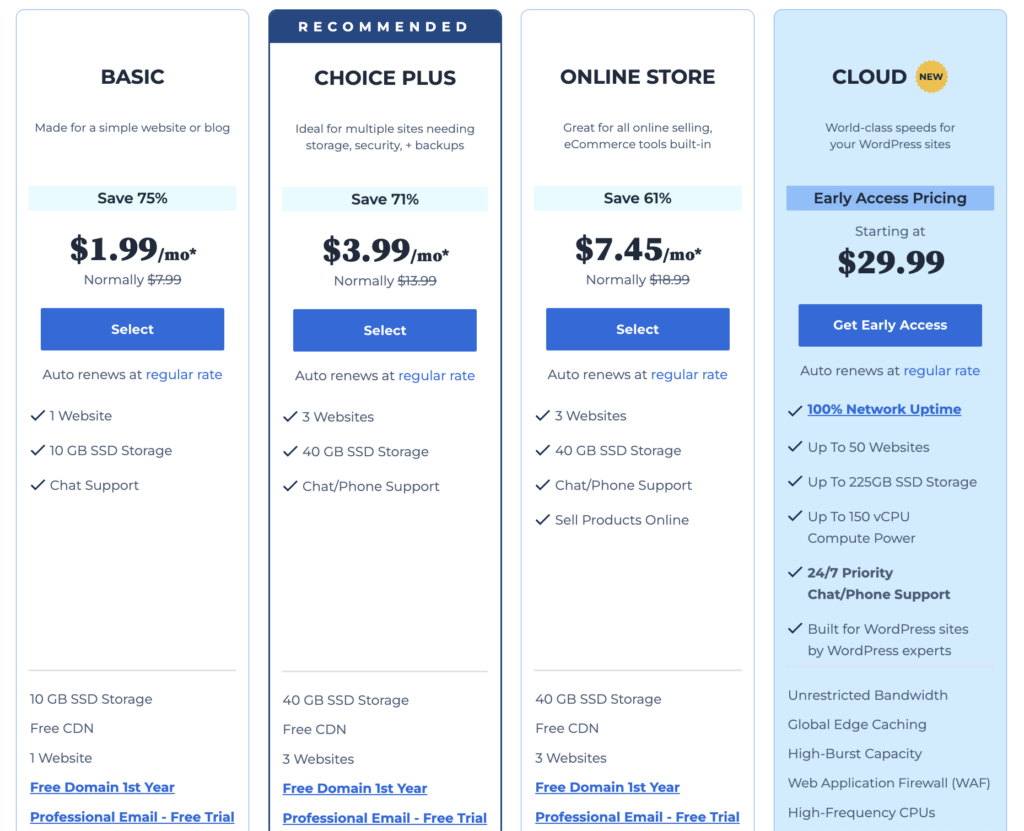
This decision is up to you, but if you’re just getting started, we recommend the Basic plan. Although it is the most affordable plan, it still has plenty of the features you’ll need to launch a blog. Click the SELECT button to get started.
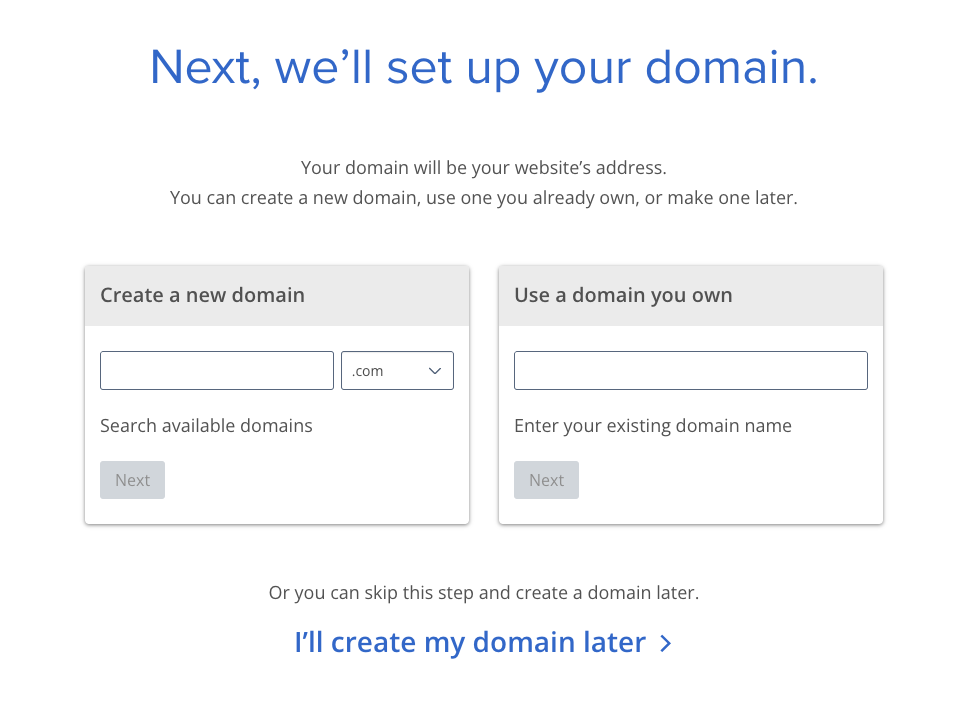
Next, you’ll enter your preferred blog domain name in the Create a new domain box. Once you land on an available domain, click the Next button. Your domain name is completely up to you and should represent the topics you’ll cover on your blog. If you’re not sure what you’d like to select as your domain just yet, you can always choose to create it later.
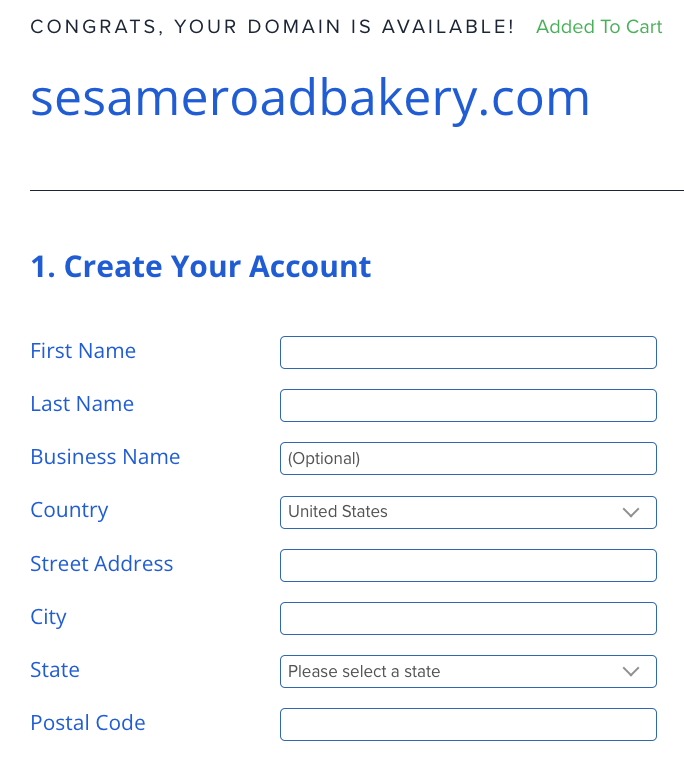
Once you’ve selected your domain name, you’ll click through to the next screen and see boxes you’ll need to fill out including personal information like your name and address. Fill these out and continue scrolling.
Now, you’ll see a breakdown of your Bluehost plan information including the type of plan you’ve chosen, the term length you’ll have the service, the total price, and your free domain name. You’ll also see additional add-ons below, like e-commerce functionality, domain privacy and protection coverage, Yoast SEO services, and more.
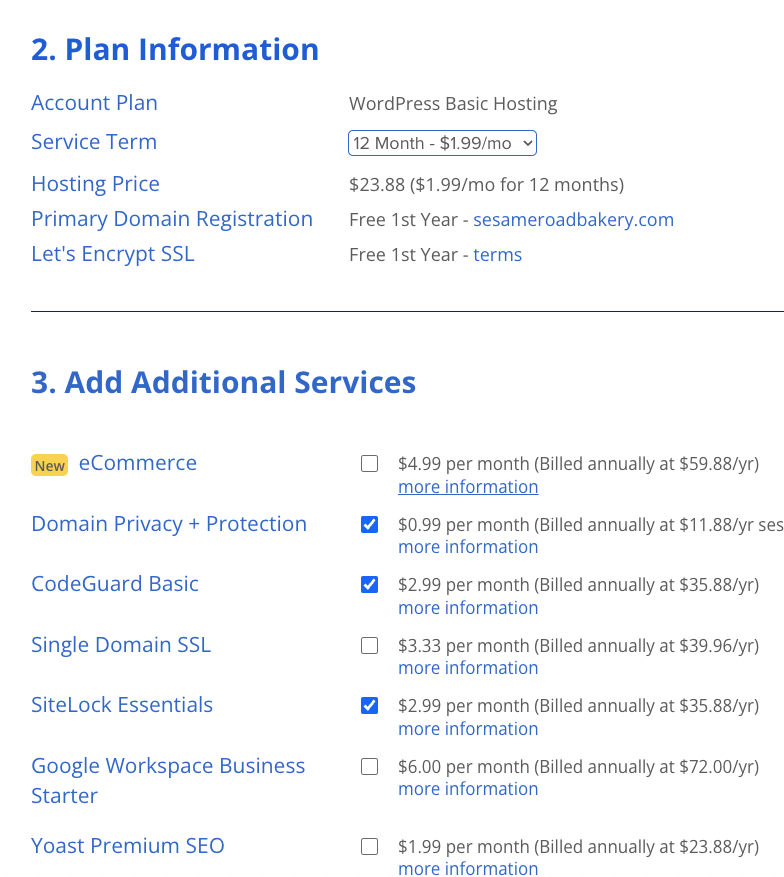
Bluehost will automatically check some of these add-ons but feel free to select what will be most helpful to you. Without any of these services, your total price will come out to about $24 for the first year.
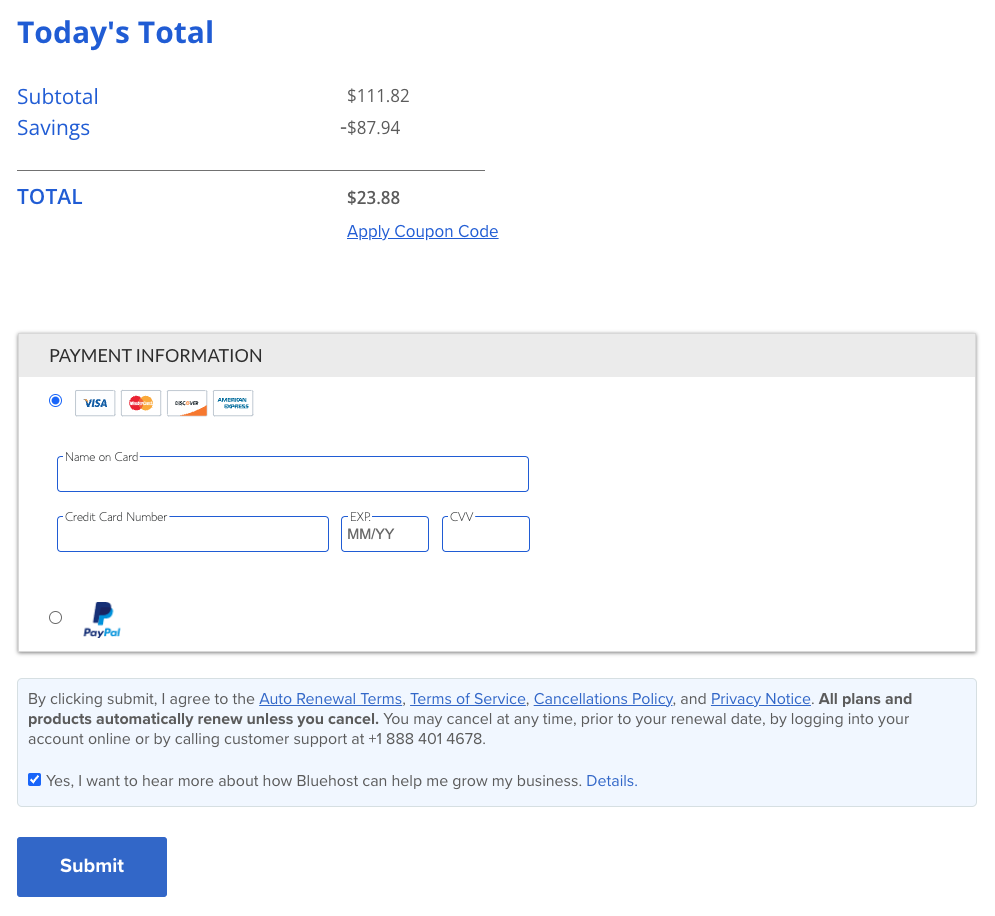
Enter your card details to finalize the process, and click Submit at the bottom of the page to complete the purchase. Congrats! You’ve successfully claimed a domain name and signed up for web hosting. You’re through the tricky bits of setting up a blog. The next steps are the fun part.
Install WordPress blog software
Now that you’ve got web hosting and a shiny new domain name, you’re ready for the second step: installing WordPress blog software.
It’s incredibly easy to install WordPress on your new website. Once you’ve finished signing up for Bluehost (or whatever web hosting service you’ve chosen), you should have received an email from Bluehost granting you access to the Bluehost Customer Area. It’s time to log in!
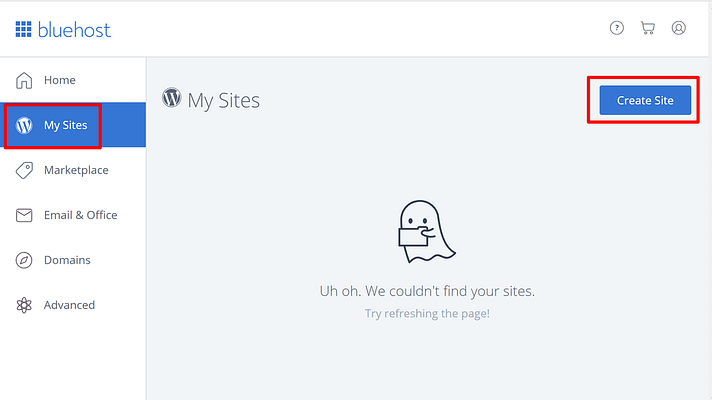
Once logged in, you’ll be guided through the process of installing WordPress onto your new site. First, click on the My Sites tab on the left and then click the Create Site button at the top right of the screen.
Soon, you’ll see this screen where you can fill out your blog’s site name and site tagline. These can be changed later so don’t stress too much about perfectly polishing them perfectly from the start.
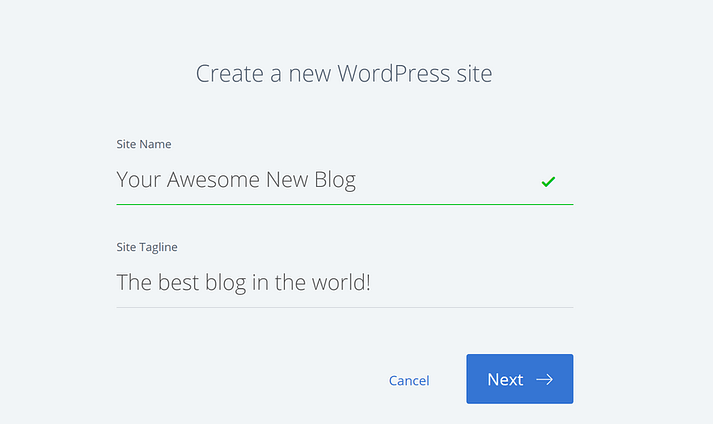
Once you click Next, you’re finished with the install process and can navigate to your new blog’s WordPress dashboard and log in at yourdomain.com/wp-admin. Bookmark this page for easy login.
Now that you’ve got web hosting, a customized blog domain name, and WordPress installed, the sky’s the limit. It’s time to get creative and customize your blog’s design.
Log in and select a theme
Your theme dictates your blog’s appearance. Once you install WordPress blog software, you’ll have a default theme already active. It’ll look something like this, depending on when you’re creating your website:
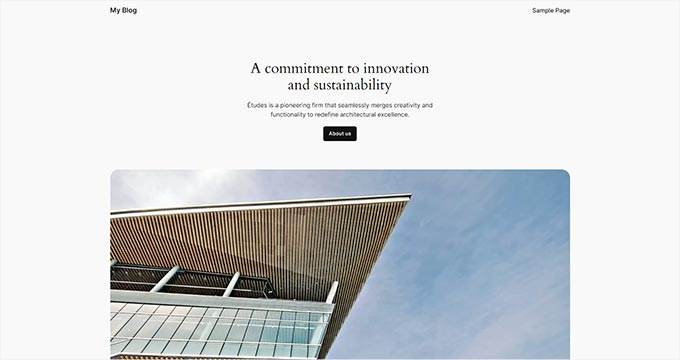
It’s pretty plain, so odds are you’ll want to change it up to make the site more engaging for readers. With thousands of different themes available for your WordPress website, you can personalize how your blog looks.
This is the fun part we were talking about!
WordPress themes for your blog
When selecting a WordPress theme, you have the choice between free and premium themes. Premium themes often have more detail and page functionality, but a free theme will work perfectly fine for a start (and possibly forever if you don’t have a specific need for premium themes).
To see the free themes available, you’ll want to navigate to the WordPress theme directory. Here, you can browse thousands (over 11,000 to be exact) of blog themes and choose one that aligns with your brand and niche. You can always change themes, but best practice says to stick to one so your readers don’t get confused every time they visit your site. Once you’re better established and understand your target audience, you can always change themes to better suit your needs.

Once you’ve chosen a theme, it’s easy to add it to your blog. Simply hover your cursor over Appearance, select Themes, click the Add New Theme button, search for the theme name, and click Install. (If you’ve purchased a premium theme, click the Upload Theme button and upload the ZIP file you received upon purchase.)
After the theme is installed, click the Activate button so it’s fully loaded onto your blog page. You can further customize it by clicking the Customize link under the Appearance tab. This is where you can change small details of your blog’s design and truly make it your own.
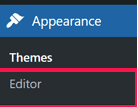
Not seeing the customize link? This might be because you’ve chosen a block theme that uses WordPress’ block editor. To edit this type of theme, navigate to Appearance and then Editor.
There are dozens of ways to edit your theme and truly personalize it to match your specific brand image, tone, voice, and appearance. After all, your blog should reflect who you are and the topics you’re writing about. You can use the WordPress Customizer (for classic themes) or the WordPress Full Site Editor (for block themes) to customize your chosen theme even more.
Note: Some themes have other ways to customize, such as Divi Theme, which has it’s own sidebar menu to help you create your website theme.
The WP Customizer allows you to improve the blog’s web design without advanced HTML knowledge, and the Full Site Editor lets you create page templates that you can reuse across the site. The customization options are deep and intricate. Test them out and see what you can come up with.
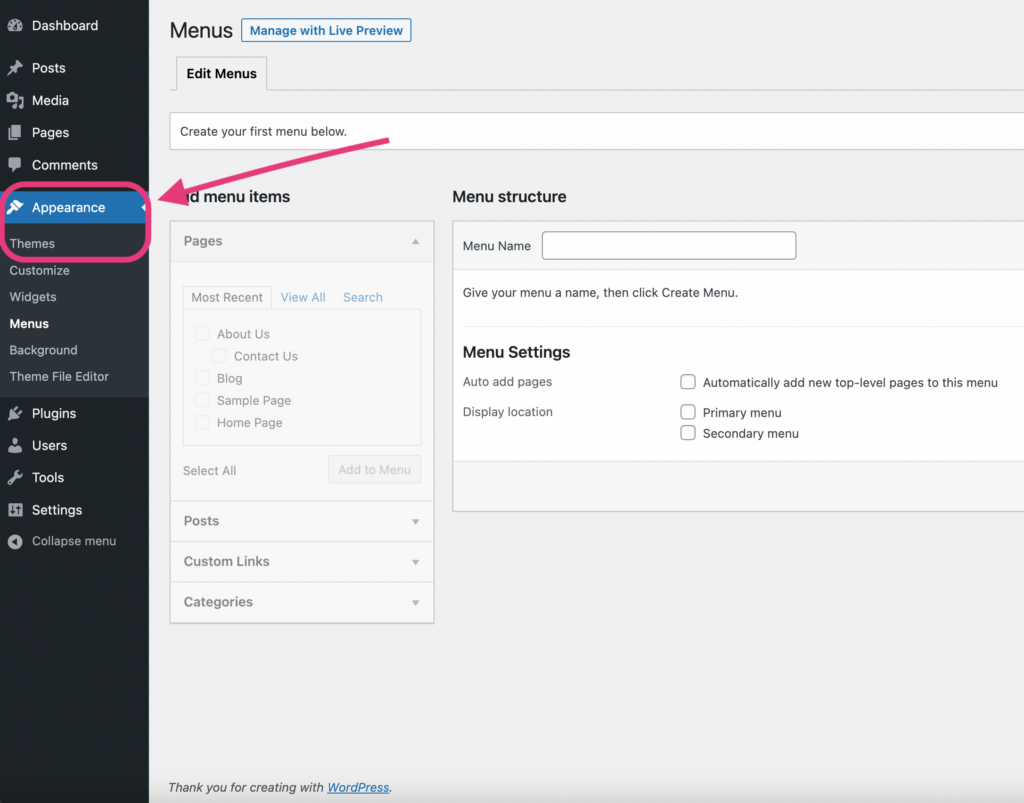
Next, you should create a navigation bar to help visitors navigate different pages on your blog, like your homepage, an about page, a contact page, or an e-commerce storefront.
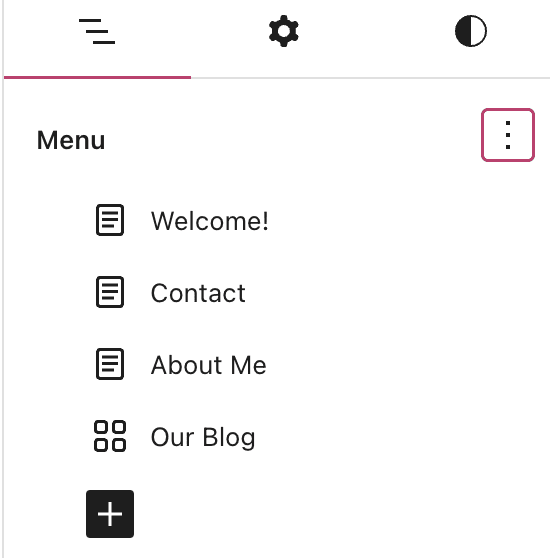
To add a navigation bar, click Appearance and then Editor to edit the block for different pages across your blog.
Write your first post
Now your blog is well-designed, but empty.
If you haven’t already done so, the first step in blogging is to brainstorm the keywords and topics that will catch the eye of your target audience. This alone can be a feat in itself if you’re a solo blogger and have to start from scratch but we have three steps for you to follow to get you thinking about your content strategy.
They are:
- Know your target audience: Again, it can take time to truly identify your audience but to start, outline your ideal audience’s interests, desires, and pain points. Brainstorming alone will give you a better idea of the types of content that will engage them.
- Conduct keyword research: By using SEO and keyword research tools, you can conduct basic research and find the topics and phrases in your blog’s niche that you can start writing about today. Pricier tools like Ahrefs and Semrush will help you create a list of keywords, but LowFruits is a great (affordable) option for beginners with low domain authority. Use it to identify longtail keywords that aren’t too competitive so you have a chance at competing for a top spot on the search results.
- Check out your competitors: Blogs of all sizes should always keep track of competitor content. Make sure to do a bit of research on other blogs in your niche to see the topics and types of content they’re creating that may also work for you.
Once you’ve done a preliminary brainstorming session using the steps above, begin to create a list of keywords and content types you’ll write about in the coming months. You don’t have to stick with blog posts alone. There are other types of content that may be more beneficial for you to focus on straight away.
Types of content you can experiment with:
- Listicles and roundups
- How-to and educational content
- Content that addresses and solves your audience’s pain points
- Guest post collaborations
- Case studies
- Original research and data reports
- Trending topics
- Q&A blogs
For a much deeper dive into creating a content strategy, we’ve written a blog dedicated to content marketing ideas. Feel free to take inspiration and use our ideas to get your creative juices flowing.
Creating a post on WordPress
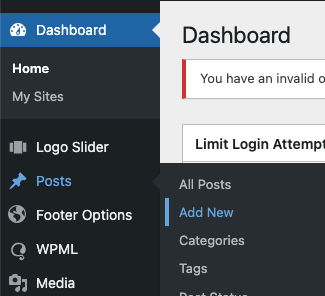
If you’re ready to create your first post on WordPress, navigate to your dashboard, hover over the Posts tab, and click Add New Post.
This will create a new post on your blog and open the editor.
Note: While the block editor is the most common one, some themes have their own version of the editor, such as Divi and Elementor.
From here, you’ll see a place to enter the title of your blog post and a place to enter body copy. If you type / at the beginning of a paragraph block, you can browse the different blocks available to you on the left-hand side, including images, CTAs, lists, quotes, tables, buttons, videos, and more. You’re also able to create your own as needed.
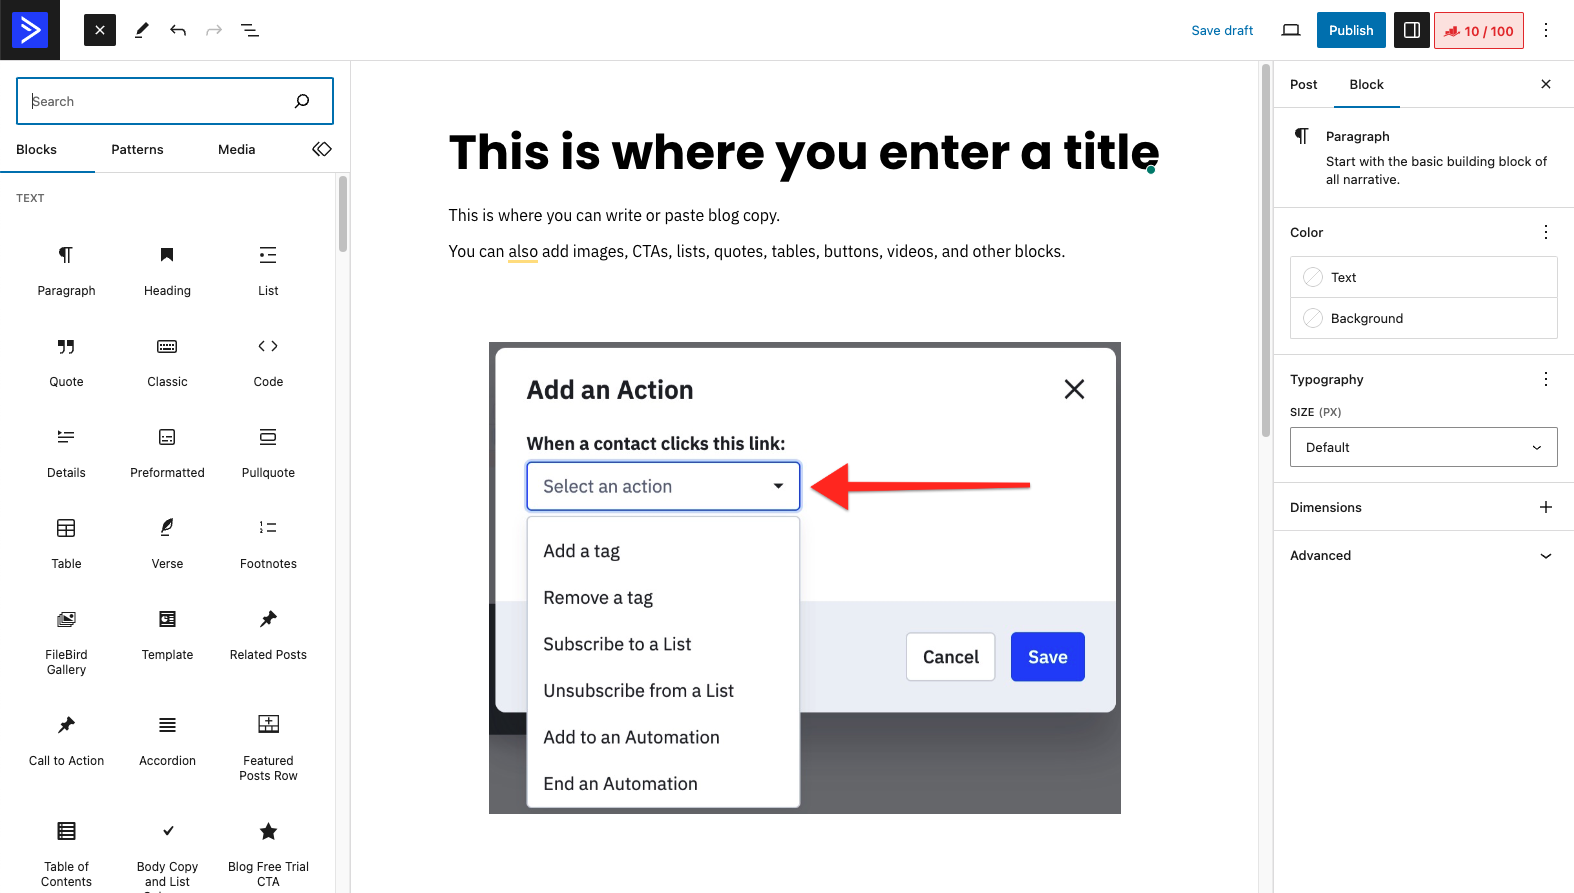
On the right-hand side, you’ll see block customization options that you can use to further personalize the blocks you use in your posts. If you click Post right next to Block, you’ll see the visibility of your post, the URL, author selection, category selections, tags, and a box to upload a featured image.
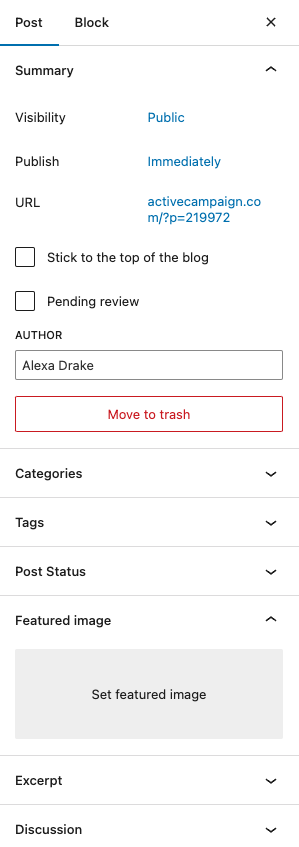
Once you’re done writing, have edited details like the URL slug, meta description and title, have chosen a category, and uploaded a featured image, you can click Publish at the top-right corner to immediately post it, or you can schedule it by clicking Immediatelyand selecting a date and time from the menu below.
Congrats, you’ve just written and published your first post on your WordPress blog!
Install WordPress plugins
Think of WordPress plugins as apps for your website that allow you to add features and functionality to your blog without knowing how to code. These could be features like image galleries, contact forms, email lists, social network buttons, and more. In fact, there are 60,000+ free WordPress plugins available today in the free plugin directory. There are also thousands of premium plugins as well.
Your new WordPress blog lets you write blog posts and create pages (and that’s about it). However, with the right plugin, you can create podcast feeds, glossaries, and many other types of content. This is why plugins are so popular and can take your blog to the next level.
Where to find WordPress plugins
To install a plugin, navigate to the official WordPress plugin directory.
There are plenty of popular and niche plugins for you to choose from, like security plugins, formatting plugins, SEO plugins, contact form plugins, and more.
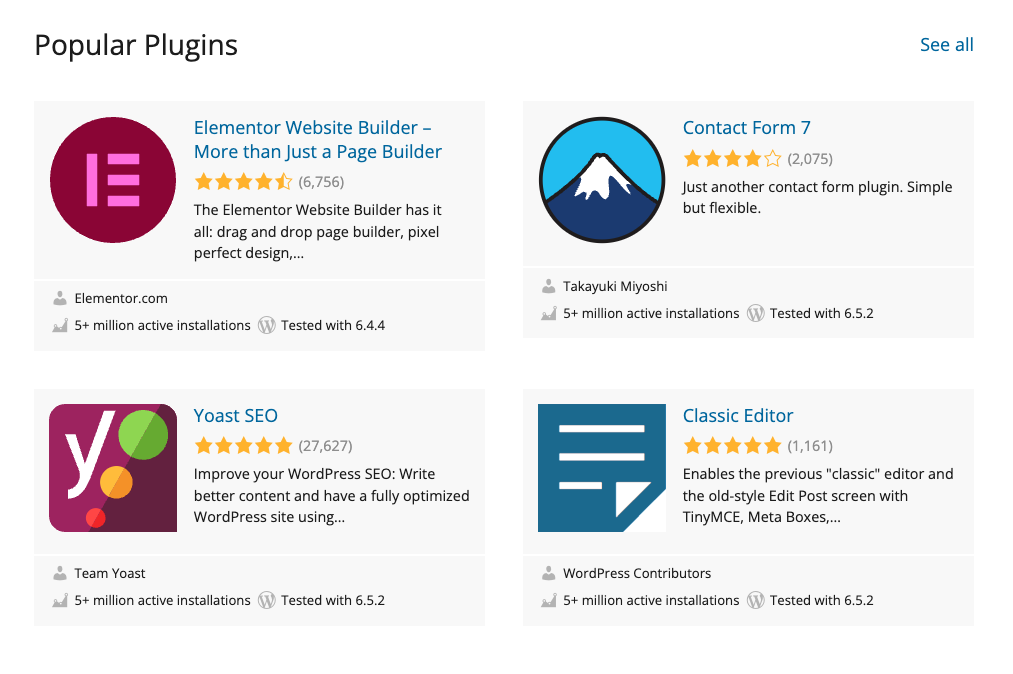
A directory of over 60,000 plugins can be overwhelming, so we’ve put together a small list of the must-have WordPress plugins for your new website.
Our list of the must-have WordPress plugins include:
- ActiveCampaign – Forms, Site Tracking, Live Chat: Embed ActiveCampaign forms directly into any post, page, or sidebar, use site tracking to track visitors to your website
- Yoast SEO: Write better content and have a fully optimized WordPress site. With the Yoast SEO plugin, you’ll get automated technical SEO improvements, like optimized meta tags, and be able to optimize how search engines crawl your site.
- Duplicator: This migration and backup plugin easily migrates, copies, moves, or clones a site from one location to another and also serves as a simple backup utility.
- WP Super Cache: This plugin generates static HTML files from your dynamic WordPress blog. After an HTML file is generated, your webserver will serve that file instead of processing the comparatively heavier and more expensive WordPress PHP scripts. (Make sure to check to see if your host has any caching installed by default, as having two of these plugins installed at once might cause problems.)
- Sucuri Security: This plugin is a security suite meant to complement your existing security posture. It provides access to features like security activity auditing, file integrity monitoring, remote malware scanning, and much more.
- Optimole: Clean up your heavy images and bloaty pages. Optimize your images in real-time with a cloud-based system to speed up your website and deliver high-quality images perfectly sized for every device.
How to install a WordPress plugin
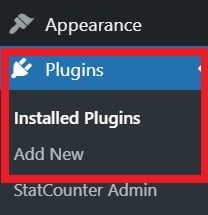
To install a plugin, go to Plugins and click Add New. You can find free plugins by simply searching for them by name or functionality and clicking Install Now.
If you want to install a premium plugin, click the Upload Plugin button and upload the ZIP file you received upon purchase. This process is identical to installing a premium theme.
Be sure to activate the plugin after installing. Existing plugins can be managed, enabled, or disabled in the Plugins tab on your WordPress dashboard.
Promote and monitor your blog
You’ve purchased web hosting and a custom domain name, installed WordPress blog software, chosen a theme, edited it, written one (or a few) posts, and added relevant plug-ins. Your blog is ready for the world to see it. The easiest way for you to promote yourself and start building your brand is to continue writing.
Blogging is a long game, and it will take time for you to build domain authority in your niche. Techniques like backlink building and landing spots in other creators’ newsletters can help speed up the process of building a following, but for the most part, it’ll take some time for your blogs to start ranking on search engines and see substantial traffic coming into your site.
In the meantime, it’s helpful to add things like CTAs, follow buttons, subscribe blocks, and other engagement elements to your blog. This can be on your homepage, in your header, in a drop-down menu, or on blog posts themselves. You can also find a plugin to add your social networks automatically to each page or post so visitors can share your articles to different platforms like Facebook, Twitter, and LinkedIn for additional promotion.
Setting up Google Analytics to monitor your blog
You can write all day, but if you don’t understand what content resonates with your audience, you’re missing a crucial piece of the puzzle. And truthfully, you’re giving up precious site traffic by not monitoring the pages your site visitors frequent.
Enter Google Analytics!
Adding Google Analytics to your blog allows you to monitor the growth of your site, track organic traffic, understand where your visitors are coming from, and gives you access to a host of insights that can help you reevaluate your writing strategy if your blog doesn’t see growth for more than nine to twelve months (yes, it will take that long if this is a brand new blog).
As a best practice, it’s recommended to install Google Analytics right when you create your blog so you can begin tracking growth month over month. To start, go to the Google Analytics homepage and sign in with a Gmail account.

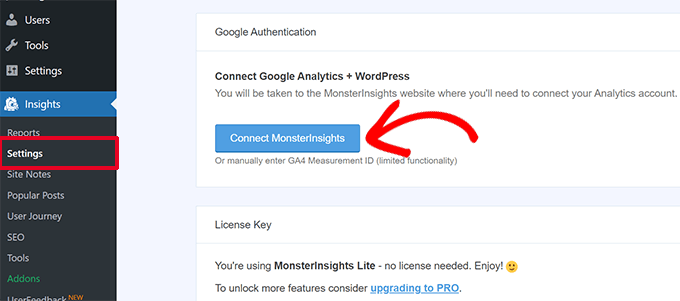
Once logged in, ‘sign up for a free GA account by entering your website information, which will give you a Google Analytics tracking code. Next, you’ll want to install the MonsterInsights plugin on your blog. It’s the free version of the best GA plugin for WordPress.
Once you’ve installed the plugin, go to your WordPress dashboard, click Insights, and then Settings. Click the blue button that says Connect MonsterInsights to easily connect Google Analytics to your new site.
From here, follow the instructions to complete the plugin setup. After a few minutes to process your data, you’ll be able to see your blog’s analytics directly in your WordPress dashboard in the MonsterInsights tab.
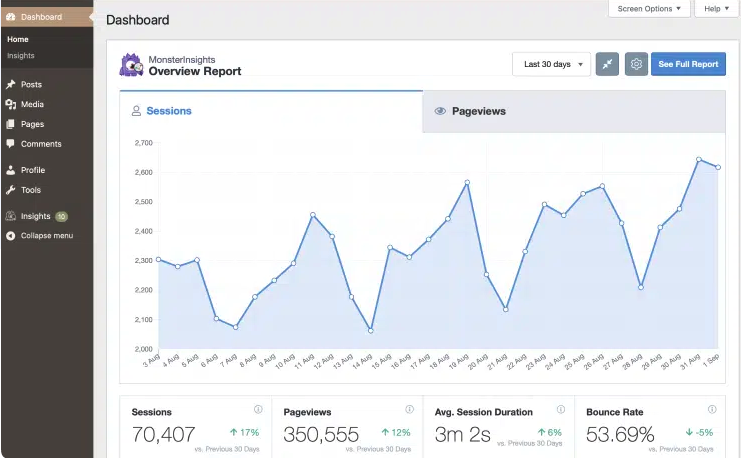
As you continue to write new content and grow your audience, using this data is the best way to understand what your visitors are engaging with, which pages they’re visiting most often, and where they exit your site. Monitoring this over time is how you can address gaps in content and make page adjustments across your site to better engage your audience.
Without this data, you’re guessing where your visitors are disengaging, which leaves too much room for incorrect interpretation. You may think they’re uninterested in one type of content, but it’s possible that by installing an analytics tool like MonsterInsights and actually seeing the data for yourself, there’s a different gap in your visitor’s journey you need to address.
The only way to know is to install and monitor.
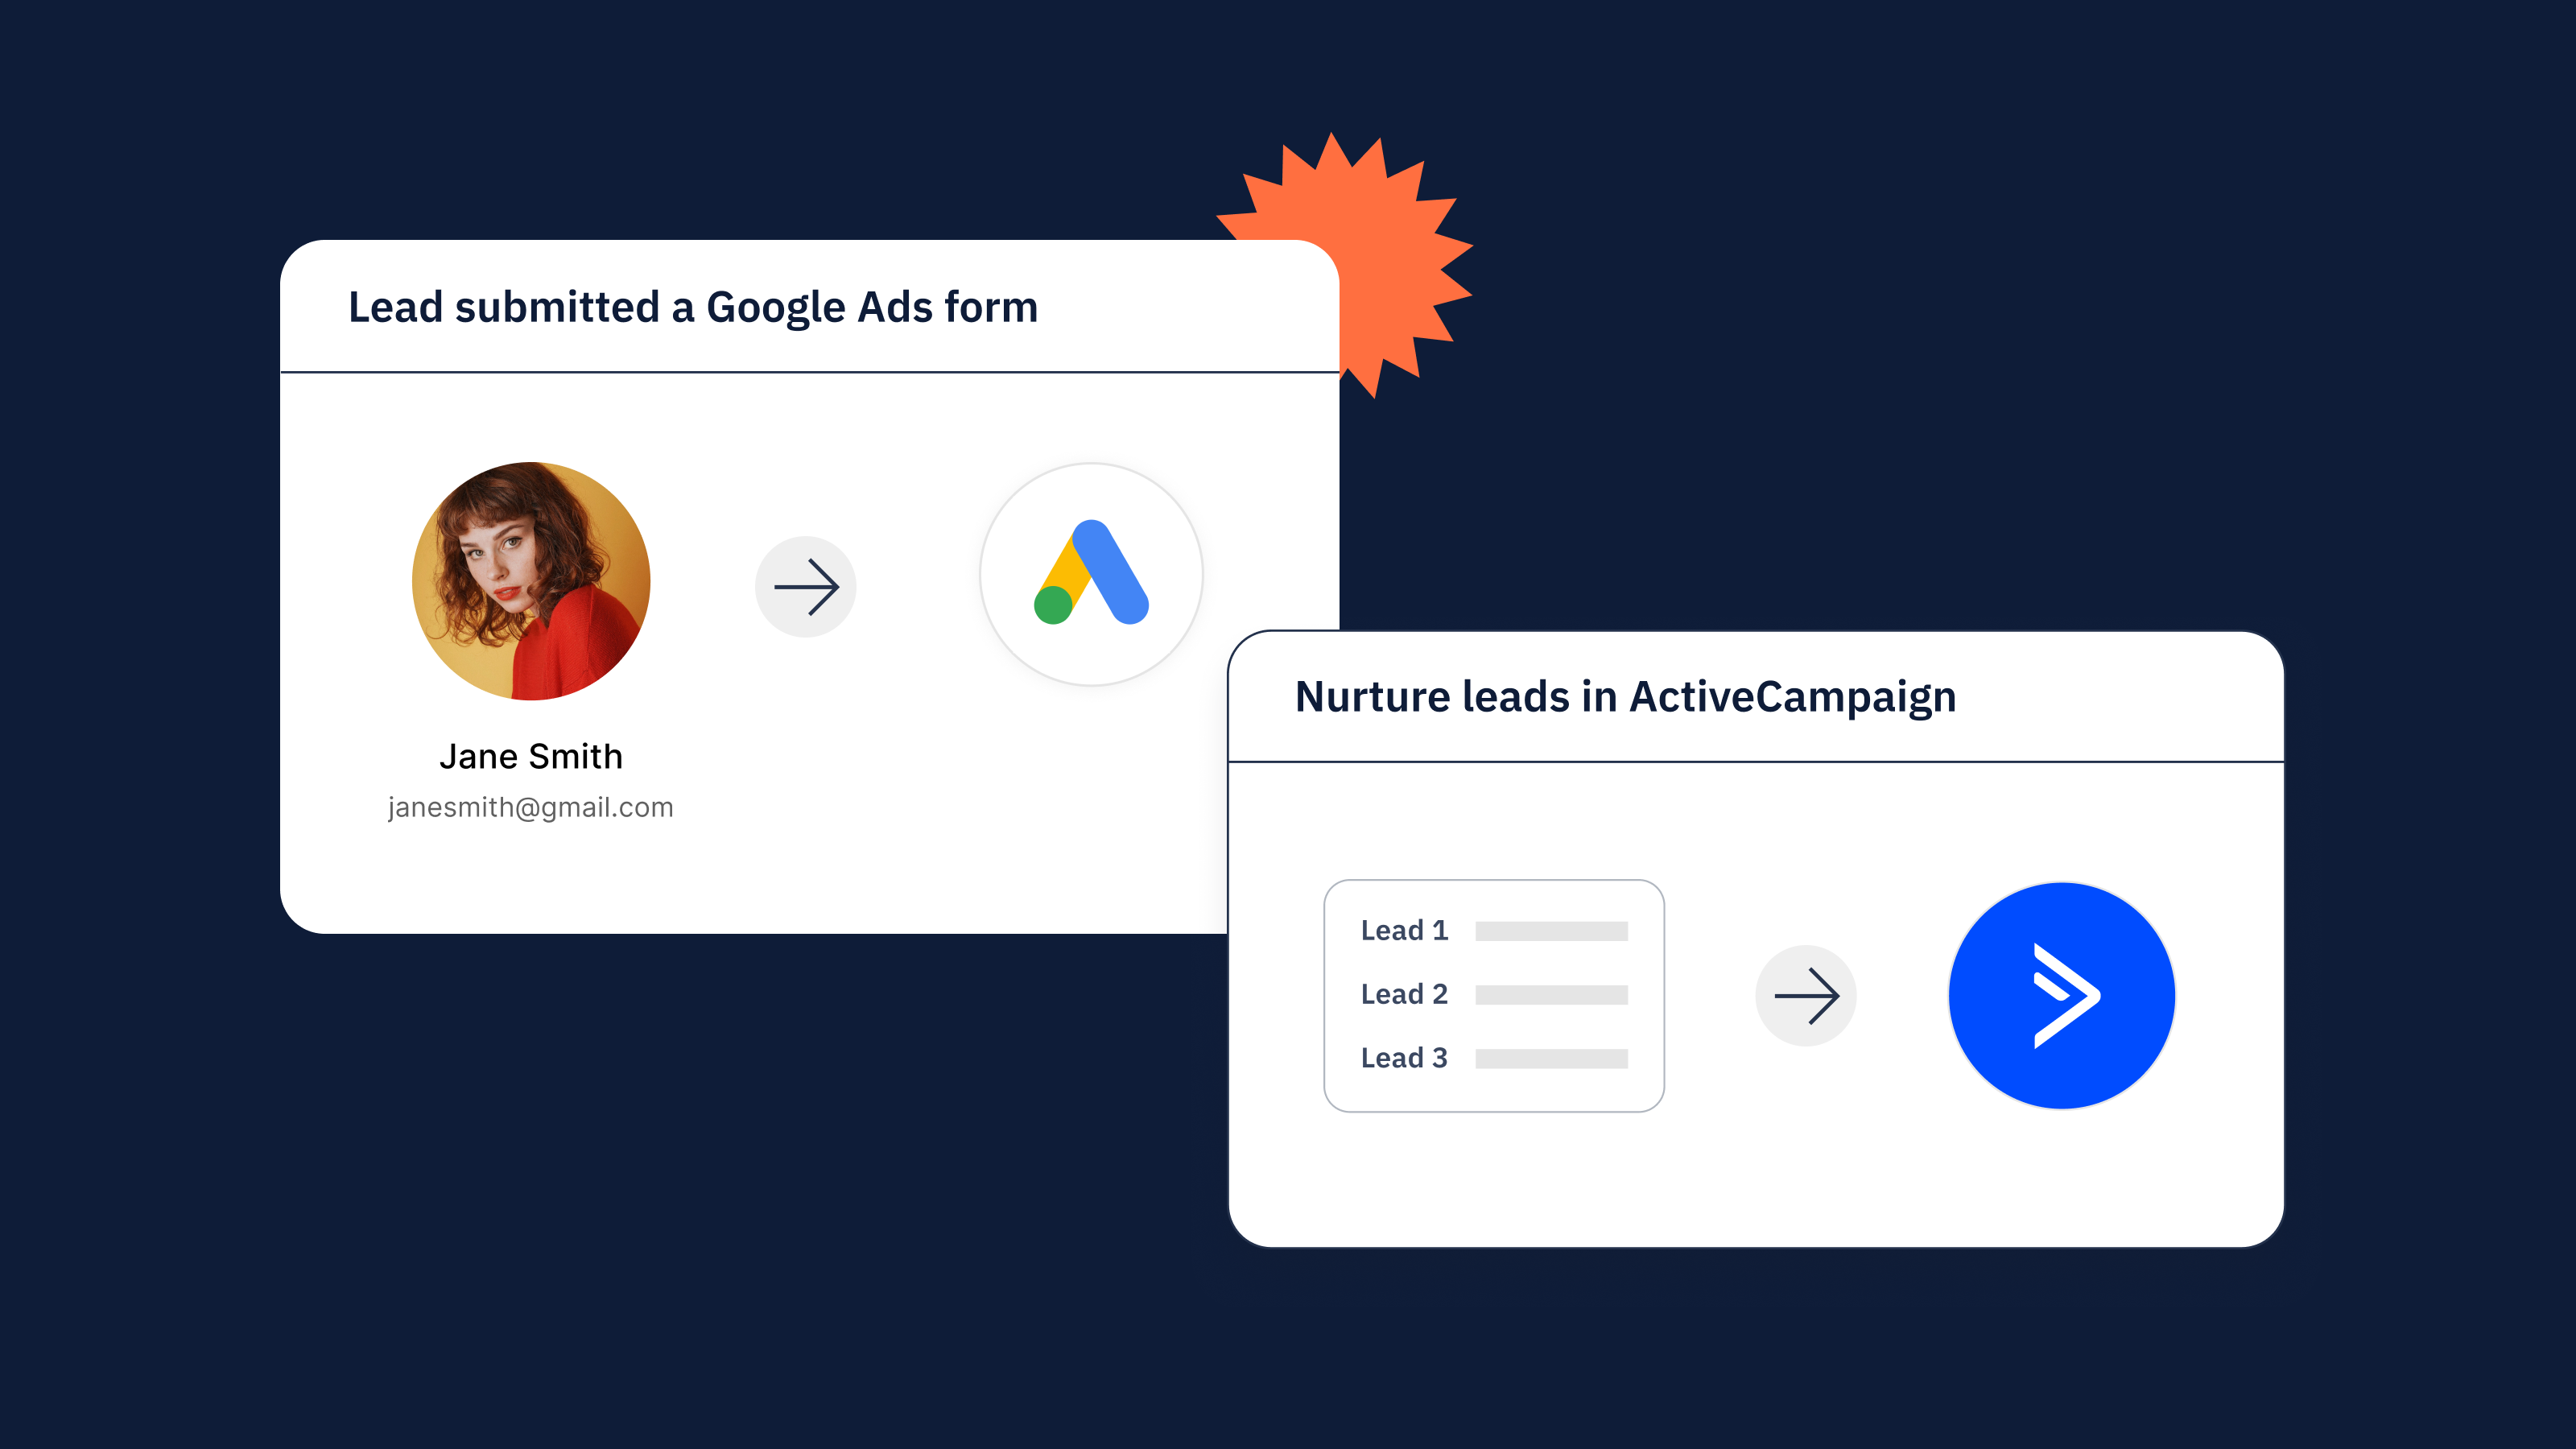
ActiveCampaign and WordPress
Integrating ActiveCampaign into WordPress lets you instantly embed ActiveCampaign forms directly into any post, page, or sidebar. Plus, site tracking is automatically enabled, allowing you to see the pages your audience is most interested in.
With just a few clicks, you can install the ActiveCampaign plugin and begin passing form data directly into your ActiveCampaign account without needing middleware like Zapier. You can also use ActiveCampaign forms on your WordPress site to help identify customers ready to buy while firing automated emails to customers who still need a little warming up.
Use site tracking to track visitors to your website
• Turn your website into a viable customer engagement channel by attributing sales and conversions to site visitors with ActiveCampaign site tracking. Discover which products, services, and information your site visitors are most interested in—then trigger automated personalized follow-up emails that drive more revenue.
All four ActiveCampaign form types are available
• Integrate your In-line, Floating Box, Modal Pop-up, or Floating Bar form with your WordPress site.
• Collect a visitor’s demographic data, preferences, and more through standard and custom fields and automatically kick off follow-up actions across email, CRM, and other channels.
Ready, set, blog!
We hope this six-step guide to setting up a successful blog on WordPress was helpful in getting you started on your blogging journey. There are many aspects outside of blog writing to consider as you create content and build your audience. Channels like social media, marketing automation, and email marketing pair perfectly with your new website and can be used together for a multi-channel marketing strategy.
If you’re thinking about the long-term and want to build your email audience, you can start by embedding forms onto your blog to collect email addresses. We have an extensive guide to email marketing that you can read once you’re ready to dive in.
Something to chew on: The number of email users worldwide is approximately 4.5 billion in 2024. There’s a lot of room for even the smallest of bloggers to have a piece of the pie.
Whether you begin planning your email strategy today or in six months, it’s never a bad idea for a content marketer like yourself to at least see what tools are available to you.
Don’t have an ActiveCampaign account but interested in testing it out so you can use it in tandem with your WordPress site? Sign up for a free trial today!